| HideElements | ||
|---|---|---|
|
|
|
| Background Color | ||||||||||||
|---|---|---|---|---|---|---|---|---|---|---|---|---|
| ||||||||||||
|
The Messages tab on the Incident Dashboard is used to send and receive messages in real-time.
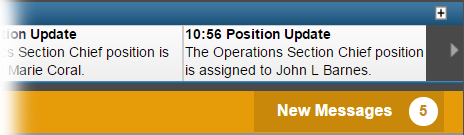
In eICS, incident participants that have any tab of the Incident Dashboard open will see a notification, located below the Recent Events ticker, when new messages are received. The notice is orange if received messages were sent with normal priority or red if received messages were sent with high priority. The notice also indicates the number of messages and/or replies on the Messages tab that are unread.
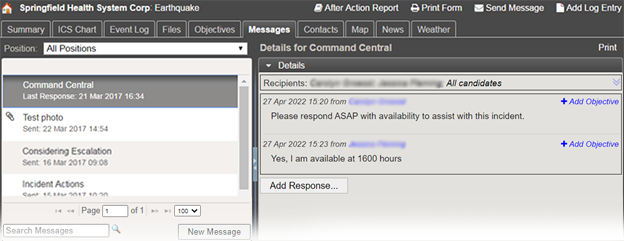
On the Messages tab, participants can view, reply to and create messages. Received and sent messages are listed on the left. Selecting a message allows you to view the message or message thread on the right. You can easily respond to messages or add them to the incident as an objective.
New messages are created from anywhere on the Incident Dashboard using the Send Message link located on the upper right of the dashboard or through the Send Message button located on the Incident Dashboard – Messages tab, below the list of messages. The Send Message window opens and allows you to quickly write and send new messages to all candidates, all assigned positions, or participants selected by name or position.


When creating or replying to messages, you can choose to send the message as an email as well. Messages are usually sent as emails only in an effort to reach participants that are not logged in to eICS.
List of Messages
When you first open the Messages tab, the list of messages defaults to show messages associated with All Positions. However, you can filter messages using the Position list, located above the messages.
In eICS, messages are listed in reverse chronological order, with the most recent item on top. Messages are differentiated by the subject, date and time sent, and number of unread messages on the message thread.
Messages appear pink when the message was sent with high priority. AA paperclip icon indicates the message has an attachment, and a preview of the attachment is included in the message.

Below the list of messages, Search Messages is available to help you find messages that contain certain words in the title or message. In the example above, you could successfully search for words
like test to view only the messages that contain that word. In the same area,
New Message opens awindow that allows you to draft and send new messages.
Message Details
When you select a message on the left, the details of that message or message thread appear on the right. Message recipients are listed at the top and, below that, each message within the message thread is listed. Message details include:
Date and time the message was sent
Name and/or position of the person who sent the message (click for contact details)
Name and/or position of the person or people the message was sent to (click for contact details)
Message content
Preview of any attachments, which you can click to open in another browser tab
Messages sent in response
On the right,
in addition to viewing the message, you can access the following options:
- Print opens the message in
- a new tab as the HICS 213 report, which you can download or print.
- Add Objective opens
- a window and prefills
- the Description
- field with the contents of the message.
- Add Response opens
- a window and allows you to enter and send a response to the original message, creating a message thread.
Send Message
When you choose to send a message, the Send Message window opens.
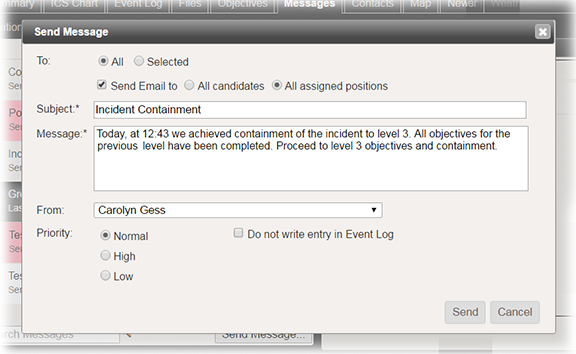
Fields on the Send Message window allow you to specify these options.
Field | Description | Options |
|---|---|---|
To | To whom the message will be sent. |
|
Send Email to selected recipients | Identifies if you also want the message sent to recipients' email address. |
|
Subject | Summary, overview or main purpose of the message. | NA |
Message | Text describing the message or main body of communication. | NA |
From | From whom the message will be sent. | By default, the user’s name is selected; however, an ICS chart position can be selected. |
Priority | Indicates the level of importance or urgency of the message. |
|
Do not write entry in Event Log | Indicates whether the message will appear in the Event Log. |
|
| Panel | ||||||||
|---|---|---|---|---|---|---|---|---|
| ||||||||