| HideElements | ||||||||||||||||||||||||||||||||||||||||
|---|---|---|---|---|---|---|---|---|---|---|---|---|---|---|---|---|---|---|---|---|---|---|---|---|---|---|---|---|---|---|---|---|---|---|---|---|---|---|---|---|
|
| Background Color | ||||||||||||
|---|---|---|---|---|---|---|---|---|---|---|---|---|
| ||||||||||||
|
Incoming shipments are inventory that does not currently have a location. These shipments might be the fulfillment of resource requests or other items that are ready to be or are in the process of being received.
It is important to process incoming shipments, using status changes, so that items are formally received and added to your inventory list. The status of these items can be changed to Stored when the items are allocated to a sub location.
Incoming shipments have two separate tabs, Active Shipments and Shipment History. Active Shipments are currently in transit or receiving. Shipment History contains older shipments that gave since been processed and received.
Note: At any point in the process, the person who created the incoming shipment can edit it, on the Incoming Shipments page, by clicking the edit icon.
To create a shipment
Note: If the Shipment Status is Stored, you must identify the Shipment QC Date and Time, Received Date, and sub location for each item.
On the lower right, in the Selected Inventory list, take either of these actions.
If you want to…
Then…
Update the quantity of the items received,
a. Click the Edit icon.
b. For Quantity, enter the appropriate number.
c. Click the Save icon.
Remove the item,
a. Click the Delete icon.
b. Click the Save icon.
Incoming Shipments Dashboard
The Incoming Shipments dashboard has many functions that you can use to help navigate through shipments.
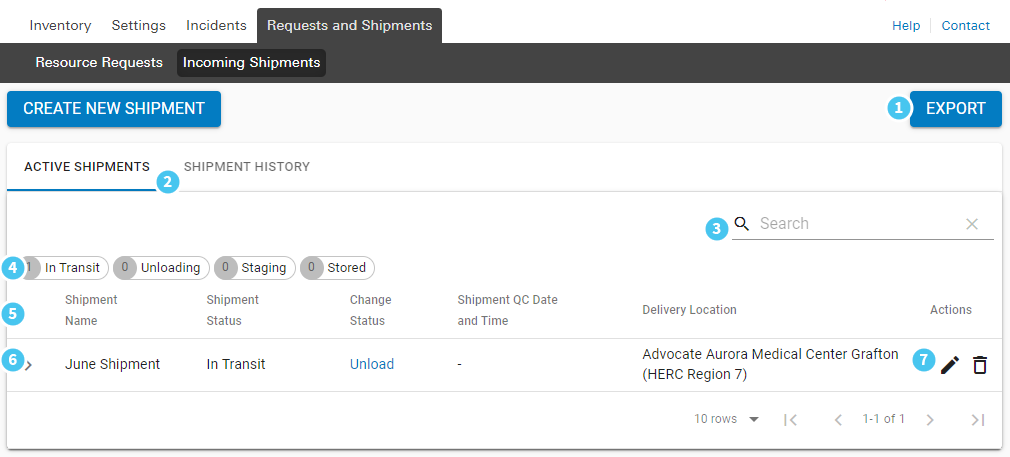
Number | Item | Description |
1 | Export | Exports the incoming shipments to an Excel compatible file. |
2 | Shipments | Allows you to toggle between Active Shipments, generated within the last 24 hours, and all other shipments on the Shipment History tab. |
3 | Search | Allows you to search using part or all the Shipment Name or Delivery Location to filter the Incoming Shipments list. |
4 | Filters | Allows you to select a status to filter the list of incoming shipments. To remove a filter and view the full list, click the X icon to the right of the selected status filter. |
5 | Sort | Allows you to click column headers (except for Change Status and Actions) to sort the list by the selected column entries. |
6 | Expand | Allows you to expand and collapse an entry to view and hide information about the items included in the shipment. |
7 | Actions | Allows you to edit or delete the incoming shipment. Deleting an incoming shipment removes it from the dashboard and it will no longer be visible or processed. Note: To view deleted requests, you can export the list and view items with the deleted status |
To import a shipment
- On the Requests and Shipments tab, click Incoming Shipments.
- Click Create Shipment. A window opens.
- Click Import Shipment. The Import Shipment window opens.
- For Name, enter a brief description of the shipment contents or purpose.
- In the Location list, click the location where the shipment is currently located.
- In the Sub Location list, click the sub location where the shipment will be stored.
- In the Incident list, click the incident with which this shipment is associated.
- For Pipe File, click Choose File. Your browser’s select file window opens.
- Navigate to and select the shipment file, then click Open.
- Click Import.
- If applicable, select the Shipment Checked check box and enter the date and time the shipment was inspected.
To process an incoming shipment

. |