| HideElements | ||
|---|---|---|
|
|
|
| Background Color | ||||||||||||
|---|---|---|---|---|---|---|---|---|---|---|---|---|
| ||||||||||||
|
If you have the appropriate rights, you can create new form templates and questionnaires. As part of this process, you specify the users and resources that can activate the form and complete it. You also specify the users and/or resources that are to receive the completed form.

The Form Configuration page shows the title and description of each form. It also indicates whether the form is configured and/or active.
The workflow for creating your form differs based on the
options you choose
in the Form Activation and Completed Form Delivery fields. The procedures below coincide with these options.
Form Activation
Completed Form Delivery
Refer to the appropriate procedure based on the form activation option you choose.
Your next step when creating a new form template is to configure your form's questionnaire.
Note the following about form creation:
Refer to About Form Configuration for detailed field definitions.
In these procedures, when you need to specify users and/or resources who are responsible for the form, you can use the search fields toward the top of the page to search by role, resource type, and/or user ID.
Typically, a form is completed by a user or a resource, not both. If you specify both, the system delivers it to both. This means the user
may receive duplicate forms—one directed to the user and a second to the user's resource.
To activate for another user to completeAnchor UserToActivate UserToActivate
| UserToActivate | |
| UserToActivate |
(User initiate & Other To Fill Out)
Use this procedure to configure forms that are activated when a user initiates the form and sends it to be completed by someone else.
The workflow differs slightly depending on the option you select for Completed Form Delivery.
From any page, open the Form menu and clickIn the main menu, click Form and then click Configure Forms. The Form Configuration page opens.
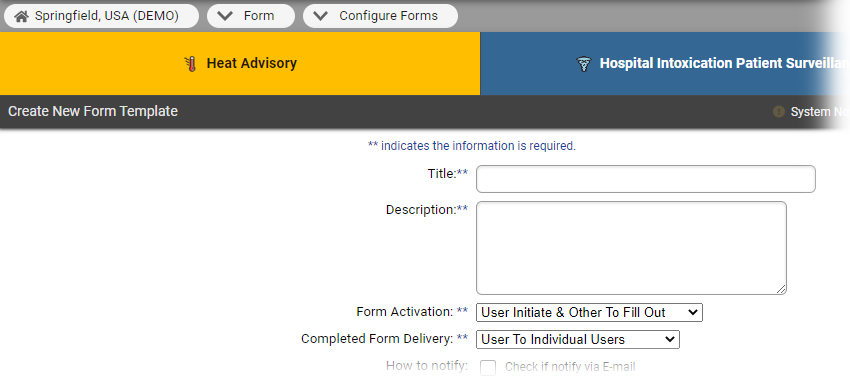
Click Create New Form Template. The Create New Form Template page opens.
For Title, enter the name of the form template
.
- For Description, enter
- details about when and/or why to use this form template.
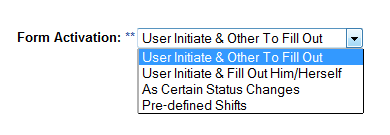
In the Form Activation list, select User Initiate & Other To Fill Out.
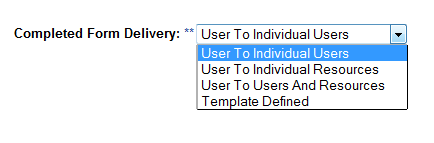
In the Completed Form Delivery list, select how you want the completed form
to be delivered
.
User To Individual Users
User To Individual Resources
User To Users and Resources
Template Defined
For How to notify,select the
checkboxes for the completed form notification methods.
In the Notification Sound list, select the sound
.
Tip: To hear the sound you selected, click Play.
In Mandatory, indicate whether form completion is mandatory.
In Active, indicate whether this form is active.
For Mandatory, select the checkbox if you want form completion to be required.
For Active, select the checkbox if you want the form to be immediately available.
Click Next. The
Users to Fill Out Form
page opens.
Select the
users responsible for completing the form.
Click Next.
The Resources to Fill Form
page opens.
Select the
resources responsible for completing the form.
Click Next.
Take one of these actions.
If
the... Then... Form Security Settings page
opens, Select the settings for the appropriate users: Activate Form
and/
or Run Report.
Click Save.
The Form Configuration page
opens. Your new form appears in the list.
Users to Receive Completed Form page opens,
Select one or more recipients for the completed form.
Click Next.
The Form Security Settings
page opens.
Select the settings for the appropriate users: Activate Form
and/
or Run Report.
Click Save.
The Form Configuration page
opens. Your new form appears in the list.
To activate and complete the form yourself
| Anchor | ||||
|---|---|---|---|---|
|
Use this procedure to configure forms that a single user activates and completes. With this option, the activator can choose to receive confirmation that the form was received and acknowledged (Read Receipt option).
The workflow differs depending on the option you select for Completed Form Delivery.
In the main menu, click Form and then click Configure Forms. The Form Configuration page opens.
Click Create New Form Template. The Create New Form Template page opens.
For Title, enter the
name of the form template.
- For Description, enter
- details about when and/or why to use this form template.
In the Form Activation list, select User Initiate & Fill Out Him/Herself.
In the Completed Form Delivery list, select how you want the completed form
to be delivered
.
User To Individual Users
User To Individual Resources
User To Users and Resources
Template Defined
- For How to notify,select the
- checkboxes for the completed form notification methods.
If you chose to deliver the form to individual users or individual resources, select or clear the Read Receipt check box, as appropriate.
In the Notification Sound list, select the sound
.
Tip: To hear the sound you selected, click Play.
For Mandatory,
In Active, indicate whether this form is active.
select the checkbox if you want form completion to be required.
For Active, select the checkbox if you want the form to be immediately available.
Click Next.
According to your selection on the Completed Form Delivery list, take one of these actions
.
If you selected... Then... User To Individual Users
The Define Completed Form Delivery Choices - Users
page opens.
Select
All Users
or clear All Users
and then select individual users.
Click Next. The
Form Security
Settings page opens.
Select the settings for the appropriate users: Activate Form
and/
or Run Report.
Click Save.
The Form Configuration page
opens. Your new form appears in the list.
User To Individual Resources
The Define Completed Form Delivery Choices - Resources
page opens.
Select
All Resources
or clear All Resources
and then select individual resources.
Click Next.
The Form Security Settings
page opens.
Select the settings for the appropriate users: Activate Form
and/
or Run Report.
Click Save.
The Form Configuration page
opens. Your new form appears in the list.
User To Users and Resources
The Define Completed Form Delivery Choices - Users
page opens.
Select
All Users
or clear All Users
and then select individual users.
Click Next.
The Define Completed Form Delivery Choices - Resources
page opens.
Select resources by doing one of the following:
select All Resources
or clear All Resources
and then select individual resources.
Click Next.
The Form Security Settings
page opens.
Select the settings for the appropriate users: Activate Form
and/
or Run Report.
Click Save.
The Form Configuration page
opens. Your new form appears in the list.
Template Defined
The Users to Receive Completed Form
page opens.
Select one or more recipients for the completed form.
Click Next.
The Form Security Settings
page opens.
Select the settings for the appropriate users: Activate Form
and/
or Run Report.
Click Save.
The Form Configuration
page re-opens. Your new form appears in the list.
To make the system activate the form upon a status change
| Anchor | ||||
|---|---|---|---|---|
|
Use this procedure to configure forms that the system activates when the specified status type is changed to a particular value
.
In the main menu, click Form and then click
Configure Forms. The Form Configuration page opens.
Click Create New Form Template. The Create New Form Template page opens.
For Title, enter the
name of the form template.
- For Description, enter
- details about when and/or why to use this form template.
In Form Activation, select As Certain Status Changes.
Note:
The Completed Form Delivery field
defaults to Template Defined
and you cannot change
it for this type of form activation.
- For How to notify,select the checkboxes for the
- completed form notification methods.
In the Notification Sound list, select the sound
.
Tip: To hear the sound you selected, click Play.
In Click Next. TheFor Mandatory,
In Active, indicate whether this form is active.
select the checkbox if you want form completion to be required.
For Active, select the checkbox if you want the form to be immediately available.
Click Next. The
Form Activation Status Type
page opens.
Select
the Status Type.
Click
the Select Status Type
.
The Form - Status Change Setting
or Set Numeric Status
page opens.
Note: The options that appear in the page depend on the status type you selected
on the Form Activation Status
Type page.
Select one or more changes that will activate the form, such as:
Whenever status change (select one or more changes).
When to send (status is above or below a specified) value.
Click Save Configuration.
The Users to Receive Completed Form
page opens.
Select the
users who are to receive the completed form.
Click Next.
The Form Security Settings
page opens.
Select
the Run Report
setting for the appropriate users.
Click Save.
The Form Configuration page
opens. Your new form appears in the list.
To make the system activate the form automatically at specified times
| Anchor | ||||
|---|---|---|---|---|
|
Use this procedure to configure forms that activate at specific times of the day or during specific shifts
.
In the main menu, click Form and then click
Configure Forms. The Form Configuration page opens.
Click Create New Form Template. The Create New Form Template page opens.
For Title, enter the
name of the form template.
- For Description, enter
- details about when and/or why to use this form template.
In Form Activation, select Pre-defined Shifts.
Note:
The Completed Form Delivery
field shows the
value Template Defined. You cannot change the value for this type of form activation.
- For How to notify,select the
- checkboxes for the completed form notification methods.
In the Notification Sound list, select the sound
.
Tip: To hear the sound you selected, click Play.
In Click Next. TheFor Mandatory,
In Active, indicate whether this form is active.
select the checkbox if you want form completion to be required.
For Active, select the checkbox if you want the form to be immediately available.
Click Next. The
Form Shift Delivery Options
page opens.
For Template to be delivered every, select the shifts during which the form is
to be delivered
.
Specify a time for each shift you selected.
Tip: Time is in the 24-hour format.
For example, for 3:30 PM, select 15 and 30
.
Click Next.
The Users to Fill Out Form
page opens.
Select the
users who are responsible for completing the form.
Click Next.
The Resources to Fill Form
page opens.
Select the
resources that are responsible for completing the form.
Click Next.
The Users to Receive Completed Form
page opens.
Select one or more users to which the completed form will be delivered.
Click Next.
The Form Security Settings
page opens.
Select
the Run Report
setting for the appropriate users.
Click Save.
The Form Configuration page
opens. Your new form appears in the list
| borderColor | #000000 |
|---|---|
| titleColor | #000000 |
| titleBGColor | #D3D3D3 |
| title | Helpful Links |
.