| HideElements | ||||||||||||||||||||||||||||||
|---|---|---|---|---|---|---|---|---|---|---|---|---|---|---|---|---|---|---|---|---|---|---|---|---|---|---|---|---|---|---|
|
| Background Color | ||||||||||||
|---|---|---|---|---|---|---|---|---|---|---|---|---|
| ||||||||||||
|
You can manage the grouped accounts that you created in the Contacts plugin. Actions that you can perform include viewing the contact record history, updating group information, modifying group access, adding and removing accounts from the groups, and deleting groups.
Note: You cannot add or remove members from filter-based groups.
To manage a group
- In the Contacts plugin, click Notification Groups.
- In the Groups page, search for the group.
- Select the group. The panel opens.
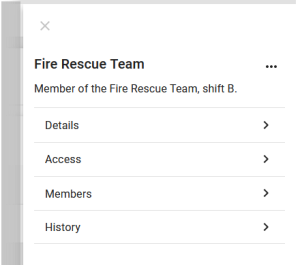
Perform any of these actions:
If you want to…
Then…
View the past updates
Click History.
Note: You cannot modify this information.
View account member details
Click Members.
Add an account to a group
See Add Accounts to a Group.
Remove an account from a standard group
- Click Members.
- Select the account you want to remove.
- Click Remove Accounts.
Delete a group
- Click the ellipsis.
- Click Delete.
Manage group details
- In the panel, click Details. The Details page opens.
- Enter or update the Name and Description as necessary.
- Click Save.
Manage group access
To add group access
- In the group profile, click Access. The Access page opens.
- Select who should have access.
- Click Save.
Note: If you select Administrators of selected organizations, perform these additional steps:
- Click Add Organizations.
- Select the organizations to which the group has access.
- Click Select.
- Click Save.
To remove organizational access
- In the panel, click Access. The Access page opens.
- Select the organization you want to remove.
- Click Remove Organizations.
- Click Save.
| Panel | ||||||||
|---|---|---|---|---|---|---|---|---|
| ||||||||