| HideElements | ||||||||||||||||||||||||||||||||||
|---|---|---|---|---|---|---|---|---|---|---|---|---|---|---|---|---|---|---|---|---|---|---|---|---|---|---|---|---|---|---|---|---|---|---|
|
| Background Color | ||||||||||||
|---|---|---|---|---|---|---|---|---|---|---|---|---|
| ||||||||||||
|
During Planning, you can add locations to an IRG to identify buildings, incidents, landmarks, people, vehicles, or weather that might provide visual context to help participants safely and successfully handle their objectives and navigate the incident. The locations you set up during planning will appear on the Map tab of the Incident Dashboard during an actual incident.
To add a location
On the Home page, point to Planning and select Plan Summary.
In the Summary for list, select the domain or facility.
On the left, select the IRG (for example, Active Shooter or Chemical Incident).
Click the Locations drawer.
Click Add. The Add Location window opens.
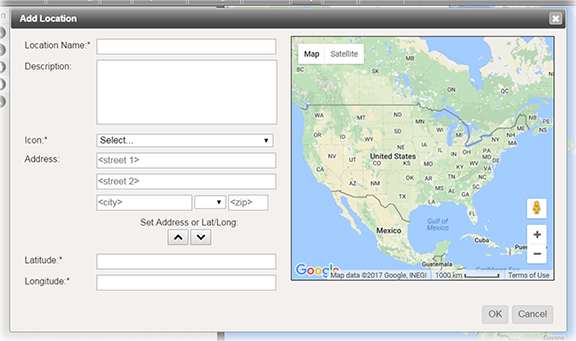
For Location Name, enter the name of this location.
For Description, enter relevant details about the location.
In the Icon list, select an icon to represent the location on the map.
Take one of these actions.
If you know the... Then... And then... Address In the appropriate fields, enter the street number and name, city, state, and ZIP Code. Click the down arrow. Latitude and Longitude Enter the geographic coordinates. Click the up arrow. Click OK.
| Panel | ||||||||
|---|---|---|---|---|---|---|---|---|
| ||||||||