| HideElements | ||||||||||||||||||||||||||||||||||
|---|---|---|---|---|---|---|---|---|---|---|---|---|---|---|---|---|---|---|---|---|---|---|---|---|---|---|---|---|---|---|---|---|---|---|
|
| Background Color | ||||||||||||
|---|---|---|---|---|---|---|---|---|---|---|---|---|
| ||||||||||||
|
Objective statuses indicate progress toward the completion of an objective. When an incident is created, all objectives are assigned the initial status that is configured for your facility. As participants start and complete tasks, they are expected to update the objective status in an effort to communicate their progress to other incident participants.
A series of default statuses is automatically associated with objectives; these include Not Started, In Progress: Exception, In Progress: Normal, Completed, and Not Applicable. However, if these statuses do not meet your organization’s needs, the Domain or Facility Administrator can customize the objective statuses by changing the number, name, color, icon, and/or order of statuses.
Note: Custom objective statuses are available when updating the status of objectives on new incidents and do not affect objectives on existing incidents.
To customize objective statuses
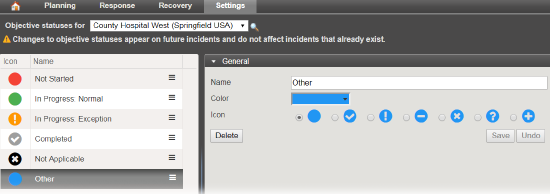
Point to Settings and click Objective Statuses. The Objective Statuses page opens.
In the Objective statuses for list, make sure the name of your facility is selected.
Take any of these actions.
If you want to... Then... Add a status,
- On the left, below the list of statuses, click Add New Status. The new status details open on the right.
- Enter the Name you want to use to identify this status.
- Click the Color list and select the color you want to use to identify this status.
- Click Save.
Delete a status,
- On the left, in the list of statuses, click the status. The status details open on the right.
- Click Delete. A warning message opens asking if you are sure you want to delete the status.
- To confirm, click Yes.
Change the name of a status,
- On the left, in the list of statuses, click the status. The status details open on the right.
- For Name, delete and/or enter what you want to appear as the name of the status.
- Click Save.
Change the color of a status,
- On the left, in the list of statuses, click the status. The status details open on the right.
- For Color, click the existing color and in the list, click the color you want to represent the status.
- Click Save.
Change the icon of a status,
- On the left, in the list of statuses, click the status. The status details open on the right.
- For Icon, click the button corresponding to the icon you want to use.
- Click Save.
Reorder statuses,
- On the left, in the list of statuses, locate the three-bar icon.
- Drag the status to where you want it in the list.
Note: Statuses in the Update Status menu appear in the order presented here, and the top status is automatically assigned to all objectives at the start of an incident.
| Panel | ||||||||
|---|---|---|---|---|---|---|---|---|
| ||||||||