| HideElements | ||||||||||||||||||||||||||||||||||
|---|---|---|---|---|---|---|---|---|---|---|---|---|---|---|---|---|---|---|---|---|---|---|---|---|---|---|---|---|---|---|---|---|---|---|
|
| Background Color | ||||||||||||
|---|---|---|---|---|---|---|---|---|---|---|---|---|
| ||||||||||||
|
eICS provides the tools you need to escalate an incident when events or situations cause it to expand beyond the scope of the current response efforts.
For example, say a tornado is coming directly toward a building on your campus. In eICS, you create an incident and choose the Tornado incident response guide (IRG) to manage the situation. Later, however, you realize that the tornado is going to force an evacuation of the building. To accommodate this new development, you would escalate the incident to include the Evacuation IRG.
Escalation expands the incident management scope to include the selected response guide, potential responders, and related files. After an escalation, you are better able to monitor, track, and manage all aspects of the incident.
Note: Any administrator or Facility Staff member assigned to a position for the incident can escalate it. External Contacts, however, cannot escalate an incident. You can escalate the incident as many times as necessary in order to expand response efforts.
Process
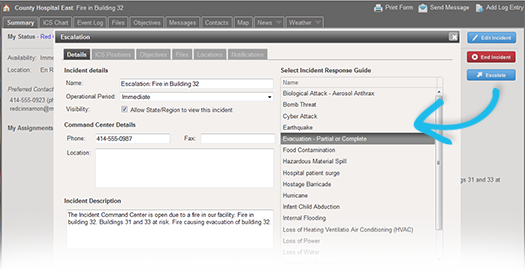
The Escalation window contains six tabs that present elements of the new IRG. You must review the content and make selections or adjustments as you proceed through the tabs. eICS automatically identifies positions, objectives, files, and locations in the escalation IRG that duplicate elements in the existing incident and removes these items. You can use the Next button to move ahead to the subsequent tab and the Prev button to return to a previous tab.
Escalation Tabs
Tab | Description | Action | Results | Dashboard |
|---|---|---|---|---|
Details | Details for the current incident, based on the IRG that was selected. |
| The IRG is compared with the current incident and differences are posted to each of the following tabs. | The Summary tab shows the changed details. |
ICS Positions | Left pane shows only the positions that will be newly activated for this escalation. |
| Changes you make on the left are reflected in the chart on the right. | The positions you select are added to the incident's ICS Chart and activated. Contacts in the depth chart for added positions and who were not part of the original incident are added to the Contacts tab. |
Objectives | Shows objectives associated with the new IRG. Those that duplicate existing objectives appear in this tab, but, by default, they are not selected. |
| The objectives you select are added to the Incident Dashboard, on the Objectives tab, at the bottom of the list. The name of the IRG is added to each objective's details. | |
Files | Shows only the files associated with the new IRG that do not already exist in the incident. |
| The files you select are added to the incident's Files tab. | |
Locations | Shows only the locations associated with the new IRG that do not already exist in the incident. |
| The locations you select are added to the incident's Map tab. | |
Notifications | Shows individuals currently assigned to positions for the existing incident. The area below that shows all candidates that have not been assigned to a position (both those from the existing incident and escalation). | Indicate the individuals you want to notify by specifying one or both methods for each. | eICS sends notifications to all those for whom you specified at least one notification method. Participants receive the notification of escalation. Candidates receive the escalation notification and are asked to respond with availability. |
Post-escalation
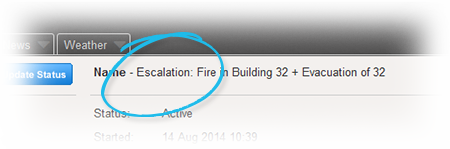
When you click Finish, the Escalation window closes. The system applies the changes listed in the Dashboard column of the table above to the incident's dashboard. Furthermore, the incident Name begins with Escalation and the text reflects the changes you made to the incident's name.
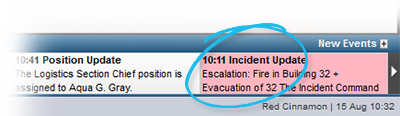
A high priority Incident Update event is added to the incident's Event Log and appears in the ticker at the bottom of the dashboard. Users logged in to eICS are alerted to this high priority entry via a sound prompt. In addition, an event is added to the log for every significant change that comes with the escalation, such as the activation of new positions and addition of locations.
The following occurs upon escalation:
All contacts currently assigned to incident positions are notified of the escalation.
All candidates associated with the IRGs and who have not been assigned to a position are notified of the escalation and prompted to respond with their availability; this includes Labor Pool members if the pool was activated as part of the escalation.
Other contacts are notified of the escalation (Other Contacts to Notify).
| Panel | ||||||||
|---|---|---|---|---|---|---|---|---|
| ||||||||