| HideElements | ||||||||||||||||||||||||||||||||||
|---|---|---|---|---|---|---|---|---|---|---|---|---|---|---|---|---|---|---|---|---|---|---|---|---|---|---|---|---|---|---|---|---|---|---|
|
| Background Color | ||||||||||||
|---|---|---|---|---|---|---|---|---|---|---|---|---|
| ||||||||||||
|
Users can create and manage dashboards with information that keeps them aware of statuses, changes, and overall conditions of resources that are important to them. The dashboards you create can be edited, configured, and/or deleted as necessary.

To create a dashboard
In the main menu, click View and then click Dashboard. The Dashboard page opens.
On the right, click Manage Dashboards and in the list, click New Dashboard. The New Dashboard window opens.
Enter this information.
Field
Description
Name
Name you want to use for this dashboard.
Number of Columns
Number of columns you want available for displaying and organizing gadgets.
Click Done. The new dashboard opens.
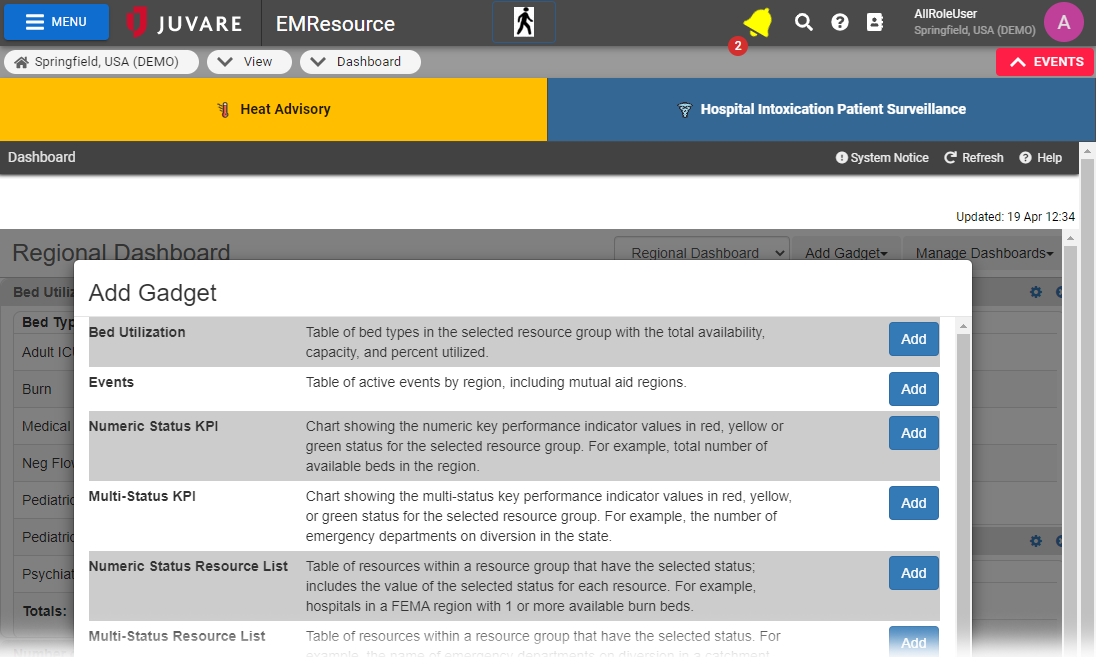
Click Add Gadget. The Add Gadget window opens.
Locate the type of gadget you want to add, and on that row, click Add. The <Gadget Name> window opens. For more information, go to Available Gadgets.
Enter the parameters for that gadget. For more information, go to Gadget Parameters.
Click Done.
To manage dashboards
In the main menu, click View and then click Dashboard. The Dashboard page opens.
Take any of these actions.
If you want to...
Then...
View a different dashboard,
Click the list that shows the name of the current dashboard and click the name of the dashboard you want to view.
Add a gadget,
Click Add Gadget. The Add Gadget window opens.
Locate the type of gadget you want to add, and on that row, click Add. The
GadgetName window opens. For more information, go
Enter the parameters for that gadget. For more information, go to Gadget Parameters.
Click Done.
Resize a gadget,
Click the lower edge of a gadget and move it up or down.
Move a gadget,
Click the gray title bar of the gadget and move it to another position on the dashboard.
Refresh a gadget,
On the gadget title bar, click the refresh icon.

Adjust the parameters of a gadget,
On the gadget title bar, click the gear icon.

Delete a gadget,
On the gadget title bar, click the delete icon.

Edit a dashboard,
- Click Manage
- Dashboards and in the list, click Edit Dashboard. The Save Dashboard page opens.
- Enter changes to the Name and Number
- of Columns fields.
- Click
- Done.
Copy a dashboard,
- Click Manage
- Dashboards and in the list, click Copy Dashboard. The Copy Dashboard page opens.
- For Name, enter the name you want to use to refer to this dashboard.
- Click Done.
Delete a dashboard,
- Click Manage
- Dashboards and in the list, click Delete Dashboard. The Delete Dashboard page opens.
- To confirm and proceed with deleting the dashboard, click Done.
| borderColor | #000000 |
|---|---|
| titleColor | #000000 |
| titleBGColor | #D3D3D3 |
| title | Helpful Links |