![]()
During an incident, the Files tab on the Incident Dashboard provides access to documents associated with the incident. With adequate permissions, you can check these files out, edit them, and then check them back in to make the edited documents available to others.
If you have Microsoft® Office® 2010 or later on your computer and are using Internet Explorer®, Firefox®, Firefox ESR, Chrome® or Safari® to access eICS, when you check out a Microsoft Office document the browser will request permission to open the document using the relevant Microsoft Office application. Documents opened and edited this way are saved directly to eICS.
Tip: If you want to view a document before deciding whether to edit it, in the General drawer, click Download to View. The file is downloaded to your computer, but not checked out for editing.
After editing is complete, the document should be checked in to indicate that the document is available for use by others. For more information about working with Microsoft Office documents, read the articles: Microsoft Office Integration and Make eICS a Trusted Site.
To check out, edit and check in a Microsoft Office document
On the Incident Dashboard, click the Files tab.
On the left, locate and click the file you want to edit.
On the right, in the General drawer, click Check Out. Your browser opens a window requesting permission to open the document with the Microsoft Office application.
On the browser window, click Open, Allow, Launch, or OK (the browser message and button text are different depending on which browser you are using) to open the document with the Microsoft Office application.
Note: The first time you check out and access a Microsoft Office document in each session, an eICS Login window opens. Enter your login credentials to verify access.In the Microsoft Office application, edit, save, and close the document. Saving the document automatically creates a version of the document in eICS, but the document still needs to be checked in.
On the right, in the General drawer, click Check In. The Check In File window opens.
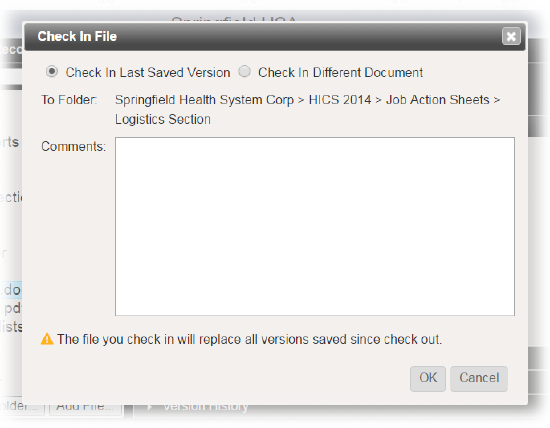
Take one of these actions.
If you want to check in... Then... A document you just finished editing with a Microsoft Office application, Click Check In Last Saved Version, A different version of the document or a document saved on your computer, - Click Check In Different Document,
- To the right of the File to upload field, click Browse. Your browser's file navigation window opens.
- Navigate to locate and select the file you want to upload.
- Click Open.
For Comments, enter notes or details about your edits.
Click OK. The document is checked in and your edited version is available to other users.
To check out, edit and check in other documents
On the Incident Dashboard, click the Files tab.
On the left, locate and click the file you want to edit.
On the right, in the General drawer, click Check Out. The document is downloaded and opened with the relevant application on your computer.
In the application, edit, save, and close the document. Saving the document replaces the original file in your Downloads folder or according to your browser settings. The document still needs to be checked in.
On the right, in the General drawer, click Check In. The Check In File window opens.

To the right of the File to upload field, click Browse. Your browser's file navigation window opens.
Navigate to locate and select the file you want to upload.
Click Open.
For Comments, enter notes or details about your edits.
Click OK. The document is checked in and your edited version is available to other users.