![]()
Your regional administrators set up available status types, such as:
Emergency Department - current service availability in the ED
Bed Avail Adult ICU - number of available ICU beds
Emergency OPS Plan - facility has/has not activated its emergency operations plan
Fuel Capacity - maximum amount of fuel a generator can hold
HazMat - facility has hazardous materials decontamination capability
Ops - resource's operational status, such as fully, limited, closed
Vents Owned - number of ventilators this facility owns
Note: Your region has complete control over configuring its status types. Therefore, most of the status types available to you are unique to your region.
If the resource is not going to collect information and report on this status type on a daily basis, the type should be set up as event only.
Administrators with the appropriate permissions can include status types (that are not event only) in your region's views.
For a user to be able to update a resource's status, the type must be visible to that user. Refer to status type visibility for details.
See the sections in this topic to learn about levels at which status types can be assigned, format types you can specify, status timers, NEDOCS labels, color coding, and much more.
Status Types View
Authorized administrators can view status types for one or more regions on the Status Types page. You can conduct a smart search on any component to quickly locate the correct status types or adjust the visible columns for a different look at the information available for all status types. Additionally, you can use the filter and column options to quickly review information and navigate through all status types on a single page.
Visible columns on the page change depending on whether one or more regions are being viewed. You can click column headers to sort the page in ascending and descending order by column. The list includes the name of each status type and its format type, such as a date, number, text, multiple option, saturation score, or NEDOCS calculation. For Multi-(option) status types, the last column shows the options currently set up for the type. The table includes the description of the type, the standard status type (if applicable), and an indication of whether the status type is available only for events.
Note: If a resource is not going to collect information and report on this status type on a daily basis, the type should be set up as event only.
Status types can be edited individually by clicking the name of the status type or by selecting the checkbox for more than one status type and clicking the Bulk Change button at the top. Editing status types in bulk opens a list of the common fields for the selected status types. Selecting multiple status types of the same data type (for example, Number, Date, or Multi) offers more common fields for bulk changes. On the Bulk Change Status Types page, status types selected for bulk changes are listed at the top. These status types can still be selected or deselected for changes. Additionally, the current selection for all common fields appears, along with other options, and a checkbox to the left of each field is automatically selected when a bulk change is identified. Saving the page enacts your changes to all selected status types.
Levels
You can assign a status type at the resource type level. This type is available to all resources in this level. You can also assign a status type at the individual resource level. This resource can report detailed information about its available personnel, services, functions, and supplies without affecting other resources in its type. You can assign the same status types to resource and sub-resource types. Depending on your situation, you may choose to create unique status types for your sub-resources in order to clearly distinguish between those that apply to resources and types that are more appropriate to the sub-resource level.
Format Types
A status type's format defines the information that the type addresses or is intended to communicate. You can set up a status type with one of the following formats:
Name | Description | Examples |
|---|---|---|
Date | Date | Date a survey was completed. Date of the most recent disaster exercise. Date of a Hospital Preparedness Program (HPP) site visit. |
Multi | Multiple choice; each option is a status | ED Status: Open, Closed, Open with limitations ED Wait Time: Green, Red, Yellow Neurosurgeon Available: No, Yes |
Number | Status communicated via a number | Number of ICU beds available. Number of doses available for a medication. |
Text | Textual response | Name of the infection control officer. Facility's area code. |
Saturation Score | Computed value based on variables the user enters, including number of patients awaiting ICU beds and acuity of current patients | Available options: Saturation Score, NEDOCS Calculation |
| Calculated | Computed value defined by an equation that uses existing numeric status types as variables | Total ICU Beds =ICU Beds + PICU Beds + NICU Beds |
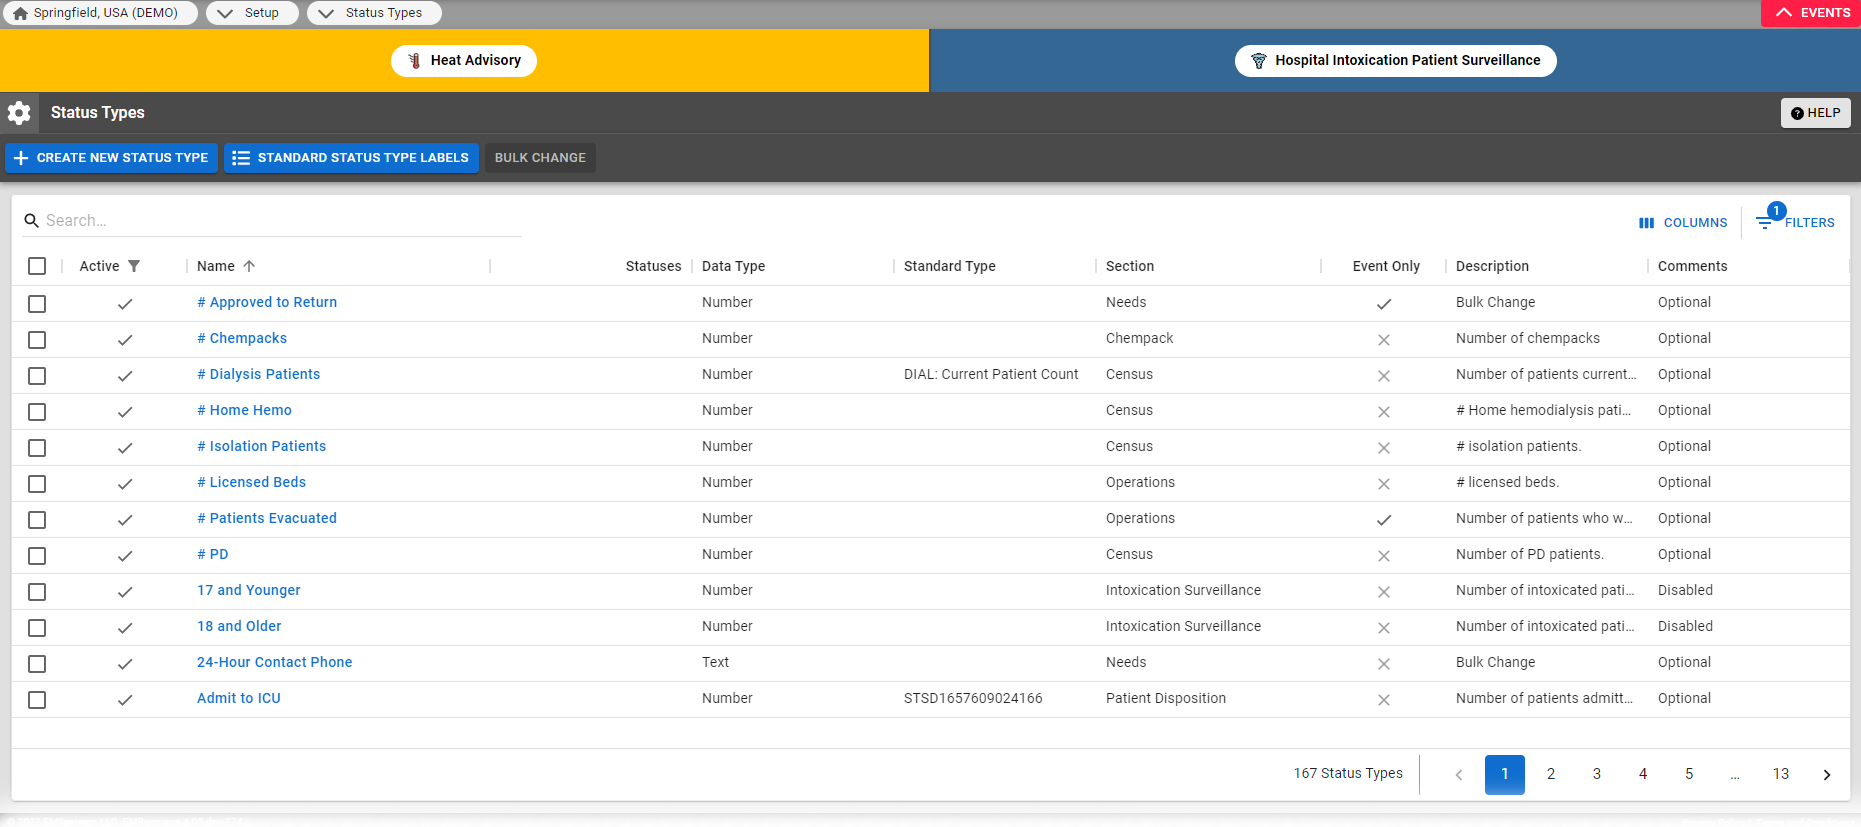
Number
For a Number status type, you have the option to include a summary total row in Views that include the status type. When configuring the status type, select the Display Summary Totals check box to enable this feature.
When enabled, the Summary row appears in the appropriate Views, and in Resource Type sections that contain at least one Number status type. The total for that status type appears at the bottom of the list of values.
For status types that are not the Number format, the summary row shows N/A.
Calculated Status Types
Calculated status types are values that are derived from an arithmetic equation of existing status and standard status types. For example, total ICU beds is a calculated status type that is derived as the sum of adult ICU beds, PICU beds, and NICU beds.
The configuration of calculated status types differs from other status types in the following ways:
- Calculated status types cannot be manually updated. Instead, calculated status types are automatically recalculated in real time when any of the component status types are updated
- Calculated status types do not expire or have reset settings.
Status Timer
If you select Multi as the status type's format, set up one or more statuses; these are the options from which the user chooses when they update this status type.
You can set up a timer for any status. This timer can count up or down to an expiration threshold or simply record the time that has passed since the status was changed.
In most cases where you use a timer you will also indicate an expiration interval in the Status Update Frequency field. You can also specify that, upon expiration, the system automatically changes to another status (Upon expiration, auto change status to) and, potentially, resets the associated comment.
You can choose from the following options:
No Timer - there is no timer for this status
Count down to expiration, then stop counting - starts at the upper end of the interval and counts down to zero
Count down to expiration, then count up - starts at the upper end of the interval and counts down to zero; upon reaching zero, it starts counting up
Count up to expiration, then stop counting - starts at zero and counts up until the expiration threshold is reached
Count up to expiration, then start counting up again from zero - Starts at zero and counts up; upon reaching expiration, the counter starts over from zero
Count up (regardless of expiration) - shows how long the resource has been on this status regardless of when it expires
If you set a timer for the status, you may also want to indicate when the timer is reset (Reset Timer).
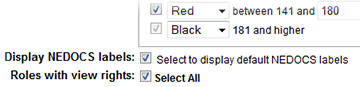
Color Coding
When you color code a status type, its values appear in the indicated color on the appropriate View pages.
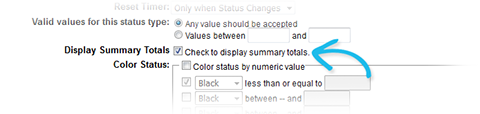
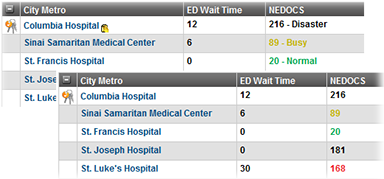
For a status type that is a number, you can color code the value based on where it falls in specified ranges. In the following example, a saturation score (NEDOCS) appears in purple when your ED is overcrowded and green for normal operations or when slightly busy.
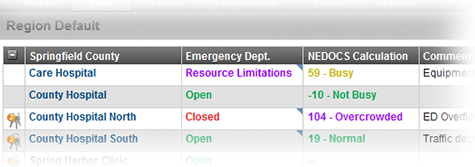
When you create or edit a number or saturation score status type, you can specify color coding. In the following example, the administrator has specified the ranges and the color for each.
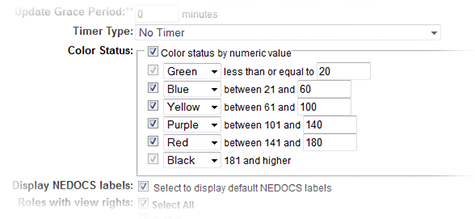
Based on the example above, if the calculated NEDOCS is 62, the number appears in yellow on View pages.
NEDOCS Labels
If your organization reports NEDOCS, the status value shows both the calculated score and an associated descriptive label. Your organization has the option to turn off the display of these default labels.
When turned off, the labels do not appear in EMResource views, maps, or associated Update Status pages.
Dashes
If the status for a resource contains dashes (--) it may have expired and may need to be updated. Place the cursor over the status; a pop-up window opens showing the date and time of the last update and indicates whether it is overdue.
User Preferences
Users can specify preferences for receiving notifications about changes to specific resource's statuses. Notification preferences can be set for any type of status type, such as number, text, multi-option, NEDOCS, and saturation score. Users specify how they are to receive these notifications--by email, text pager, and/or Web (EMResource). Administrators can also specify these preferences for users they manage.
Visibility
Your region can establish varying levels of control over the visibility of your resources and their statuses. The tighter the access, the more you can ensure that users cannot obtain information that does not pertain to them.
Example: You want your blood bank users to log in to EMResource to report the availability of specific blood types, but these users do not need to be able to view hospital bed and resource availability. You can limit these users’ access to blood bank information.
This topic covers your visibility options for a status type and provides an overview of steps to take for each option: Shared, Normal, Private.
You can also restrict an individual user's visibility into a resource's status types. Refer to About Users: Access to Resources for more information.
Option Summary
The Edit (type) Status Type and Create (type) Status Type pages contain three options for allowing view access to status types.
Tip: "Format type" refers to the format of the status type: Date, Multi, Number, or Text. It can also indicate the type is a calculation, as in Saturation Score and NEDOCS Calculation.
Refer to the following graphic and table for descriptions of your options:

Level | Option | Description | Scenarios |
|---|---|---|---|
Shared | Allow regions with mutual data sharing agreements to view this status type | A Shared level of visibility indicates this region shares this status type with other regions (with which it has mutual aid agreements). When selected, all roles are automatically granted view rights and you cannot change these settings. | A user in another region can view this information as long as their administrator granted them access to other regions. In general, a user in this region can view this status type. Select this option for status types you intend to share with other Juvare applications. With this option selected, you cannot apply viewing restrictions in your own region. |
Normal (role-based) | Users with appropriate roles within the region may view or update this status type | A Normal level of visibility makes it easy to give users the right to view a status type based on their role. | Users in this region can view the status type if their role can view it. An administrator removes an individual user’s visibility for specific resources by refining the user’s profile. Users in other regions cannot view this status type. |
Private | Only users affiliated with specific resources may view or update this status type | A Private level makes it easy to restrict its visibility. The status type can be “hidden” from all users except those who should be able to see it. | A user in this region must be specifically affiliated with a resource to be able to view this status type. That is, the user must have at least one of the following rights: Associated With, Update Status, or Run Reports. The user’s role is not a factor in this type of visibility. Users with the View - Override viewing restrictions right may also view this status type. This right can be assigned on either the role or the user level. Users in other regions cannot view this status type. |
Note the following:
If your region or an affiliated entity is using eICS (Juvare application), keep in mind that only status types with Shared visibility will be available to users of eICS.
If you share a status type, making it visible to users in other regions, all roles automatically have view rights and users cannot change these settings.
When a resource has no visible status types for a View, it does not show in that view. When a user has no visibility into a resource’s status types, that resource does not appear in any of the user’s View pages.
To update a resource’s status, the user must be granted that specific right.
Setting Up
To set up Shared visibility, do the following:
Element | Action | Refer to... |
|---|---|---|
Resource | Select the Share with Other Regions check box | |
Status Type | Select the first option in Status Type Visibility: Allow regions with mutual data sharing agreements to view this status type |
To set up Normal (role-based) visibility, do the following:
Element | Action | Refer to... |
|---|---|---|
Status Type | Select the second option in Status Type Visibility: Users with appropriate roles within the region may view or update this status type Select the roles that can view the status type and the roles that can view and update the status type | |
Role | Select the status types that a user with this role can view (Select the Status Types this Role may view), or can view and edit (Select the Status Types this Role may update) |
Note the following about roles:
When you create a new role, by default users with that role have the right to view and update all status types.
If you grant a role the right to update a status type, you must also grant them view access
To set up Private visibility, do the following:
Element | Action | Refer to... |
|---|---|---|
Status Type | Select the third option in Status Type Visibility: Only users affiliated with specific resources may view or update this status type Select the roles that can update the status type | |
User | Select one or more of the following resources rights for a user: Associated With, Update Status, Run Reports |
Fields and Options
The following table lists and describes status type fields, and indicates the format types for which each is applicable:
Setting | Description | Type |
|---|---|---|
Name | Name of the status type (required) | All |
Standard Status Type | Standard language for this status type, such as types based on HAvBED categories or related to a specific service, such as dialysis (read only) | Number, Multi, Text |
Description | Description of the status type (required) | All |
Active | When selected, indicates this status type is active and available for use; default value is selected (active) | All |
Event Only | When selected, the type is available for events only Note: If a resource is not going to collect information and report on this status type on a daily basis, set it up as event only by selecting this checkbox. | All |
Status Type Visibility | Indicates the type is potentially visible to users in other regions, is visible to this region's users based on the user's role, or is private; if you make it visible to users in other regions, all roles automatically have view rights and you cannot change these settings | All |
Section | Indicates the status type section in which this type appears within the resource's details page (required); a status type can appear in only one section | All |
Resource Detail View | Select to show this status type in the resource's details view | All |
Color Status | Color codes the value based on where it falls in the specified ranges | Number, Saturation Score, NEDOCS Calculation, Calculated |
When updating the status, comments are | Optional, mandatory, or unavailable when updating the status | Number, Text, Saturation Score, NEDOCS Calculation, Date |
| Initial Value | Default value of a status type, which is retained until the status type is updated. | All |
Reset Value | Upon expiration, the system resets the status type or retains the value | Number, Text, Saturation Score, NEDOCS Calculation, Date |
Reset Comment | System resets the status comment at each update or retains the comment between updates | All |
Trace User | When selected, requires user to enter their name and password to change the status; this option appears in status type pages only when the related option is selected in the region's profile page | All |
Exempt from Must Update | User is not required to update this status, even when the user has the Status - User must update overdue status right | All |
User must update status daily for | Status expires at the indicated time(s) on a daily basis (24-hour format) | All |
Status Update Frequency | Status expires whenever the status changes or at the indicated interval (days / hours / minutes) | Number, Text, Saturation Score, NEDOCS Calculation, Date |
Update Grace Period | Period of time considered to be out of the expiration range (minutes); required, default value is zero) | All |
Status Reason | Reasons from which the user can or must choose when changing this status | Multi |
Timer Type | Enables the display of a counter (down or up) to status expiration in the application window | All |
Reset Timer | System resets the expiration timer when the status changes or when there is an update to the status | Number, Text, Date |
Required | When selected, a blank value is not allowed for this status | Text, Date |
Valid values for this status type | Any entered value is accepted or indicate the valid value range | Number, Date |
Display Summary Totals | When selected, a Summary row appears in views at the bottom of the associated resource type section. A total is shown in this row for all status types with the type Number for which this setting has been enabled. Other status types and other Number status types that do not have this setting enabled show N/A in the Summary row. | Number |
Display NEDOCS labels | When selected, displays the predefined descriptive label next to the calculated score in the Update Status page, regional views, and maps; clearing this checkbox removes all labels from the view | NEDOCS Calculation |
Roles with view rights | Selected roles can view the status type | All |
| Roles with update rights | Selected roles can update the status type | All |
Resource Types | Selected types are associated with this status type | All |