![]()
Authorized users can create incidents in EMTrack by designating details such as the Incident Type and whether participant staging is allowed, as well as the location, contact information, incident sites, and provider settings.
When you create an incident, the system automatically fills in certain information, which you can add to or change. This information includes:
- Contact fields, such as your name and email
- Settings, such as the start date and time
- Default incident sites (depending on the incident type)
- Default providers and their access level
Refer to Incidents for details on default information and user roles that can create and edit incidents.
To create an incident, complete these procedures:
- Select the incident type
- Specify general information
- Specify incident sites and sublocations
- Work with providers
To select the type
- Click the Incidents tab.
- Click Create Incident. The Create Incident window opens.
- In the Incident Type list, click the type of incident you want to create.
- If appropriate, select the Allow participant staging check box.
- Click Next. Another Create Incident window opens.
- For Name, enter the name of the incident.
- For Description, enter basic details about the incident.
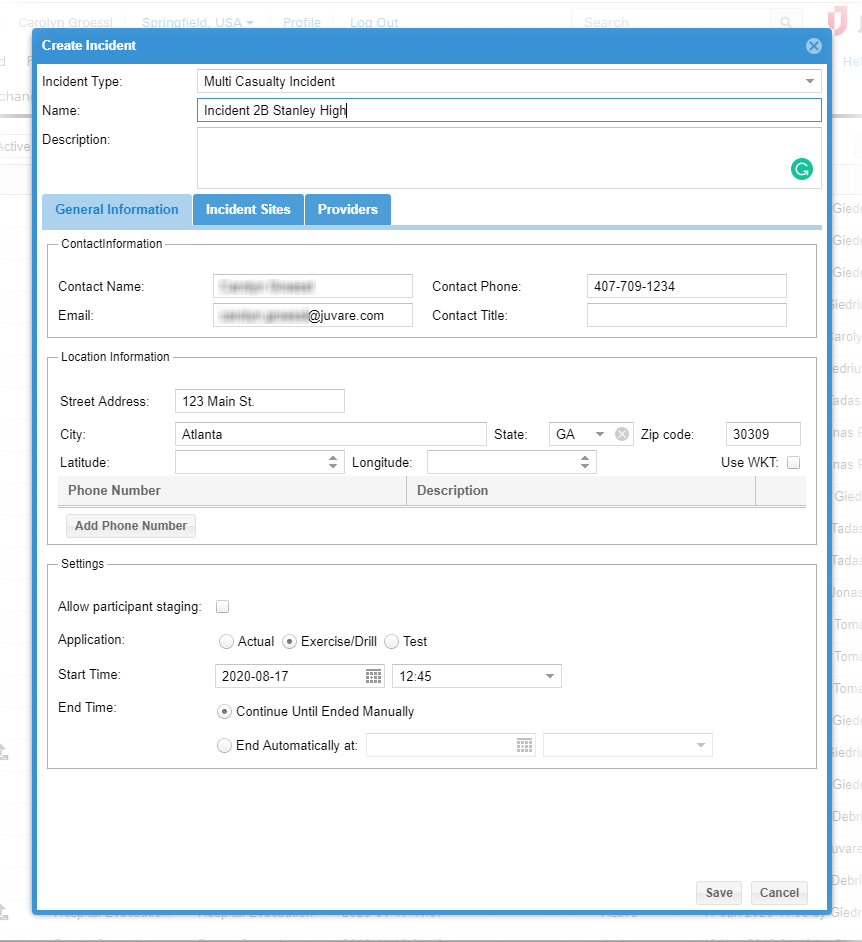
To specify general information
- If it is not already selected, within the Create Incident window, click the General Information tab.
- In the Contact Information section, edit and/or enter the Contact Name, Contact Phone, Email, and Contact Title.
- In the Location Information section:
- If appropriate, enter the Street Address, City, State, and ZIP Code of the incident.
- To add a phone number, click Add Phone Number.
- Enter the Phone Number and Description.
- Repeat these steps to add another phone number.
- In the Settings section:
- If appropriate, select the Allow participant staging check box.
- For Application, click Actual, Exercise/Drill, or Test.
- If appropriate, add or change the Start Time:
- Change the default value to the appropriate date and time.
- Set the date and time the planned event will start.
- Remove the default date and time.
Tip: You do not have to specify a start date and time for pending incidents.
- Indicate the End Time by clicking and/or specifying one of these options:
- Continue Until Ended Manually
- End Automatically at: (date) (time)
To specify incident sites and sublocations
- Within the Create Incident window, click the Incident Sites tab. Depending on the selected incident type, some sites may be provided by default.
- To edit an incident site:
- Click the Name and make your changes.
- Click the Address and make your changes.
- To find the site Latitude and Longitude, click the map icon. The map opens.
Note: The map opens unless the address was incomplete or more than one location was returned for the address. In that case, the Select Address window opens. Locate and select the correct address. Click OK. The map opens. - Verify that the address marker is correctly located on the map. If necessary, drag the marker to reposition it.
- In the upper right, click the close icon to dismiss the map. The Latitude and Longitude have been entered for the mapped location.
- Click Status and in the list, click Not Started, In Progress, or Complete.
- To delete an incident site, on that row, on the right, click the delete icon.
- To add an incident site:
- Click Add Site. A row is added to the list.
- On that row, enter the Name and Address.
- If appropriate, click the map icon to identify the site Latitude and Longitude.
Note: The map opens unless the address was incomplete or more than one location was returned for the address. In that case, the Select Address window opens. Locate and select the correct address. Click OK. The map opens. - Verify that the address marker is correctly located on the map. If necessary, drag the marker to reposition it.
- In the upper right, click the close icon to dismiss the map. The Latitude and Longitude have been entered for the mapped location.
- If appropriate, click Status and in the list, click Not Started, In Progress, or Complete.
- Repeat these steps to add other sites.
Tip: To view a map that shows all incident sites, click Map Sites.
- To add a sublocation:
- Locate the site and on that row, on the right, click the edit icon. The Edit Sub-Locations window opens.
- Click Add Sub-Location. A row appears.
- For Name, enter the name of the sublocation.
- Repeat these steps to add additional sublocations.
- Click OK. The Edit Sub-Locations window closes.
Tip: Click the plus icon to the left of a site name to view its sublocations.
- To edit a sublocation:
- Locate the site and on that row, on the right, click the edit icon. The Edit Sub-Locations window opens.
- Click a sublocation name to edit it.
- Click OK. The Edit Sub-Locations window closes.
- To delete a sublocation:
- Locate the site and on that row, on the right, click the edit icon. The Edit Sub-Locations window opens.
- On that row, click the delete icon.
- Click OK. The Edit Sub-Locations window closes.
To work with providers
- Within the Create Incident window, click the Providers tab.
Tip: For a brief description of the access levels you can assign to providers, click the Help icon located near the Access column. - To add or change providers:
- Click Add Provider. The Search Providers window opens.
- On the left, select the check box for all or each individual Provider Facility and Mobile Provider Organization. If you select Unspecified, enter the Provider Name, City, and/or ZIP Code.
- Click Search Providers. The right pane shows the results.
- On the right, select the check box for all or each individual provider you want to include on the incident.
- On the lower right, click Add Providers.
- If necessary, repeat these steps to add more providers.
- If you want to change a provider's access, click their current access and select a different level.
Tip: Use the search field at the top of the Participants tab to quickly locate a particular participant. Enter all or part of the participant name in the field. The system automatically returns all matching providers. - To delete a provider, click its delete icon on the right.
- Click Save.