Home > EMResource > Guide - Setup Dashboards > Create Shared Dashboards
![]()
Administrators can share dashboards with users in their region by specifying the name, layout, whether the dashboard is Active, and whether it should be available to All Users, Selected Roles, or Selected Users. Like personal dashboards, shared dashboards appear blank at first and must be configured by adding gadgets. Shared dashboards can be edited, configured, and/or deleted by administrators and other users that have adequate permissions.
To create a shared dashboard
In the main menu, click Setup and then click Dashboards. The Dashboard List page opens.
On the right, click Create Shared Dashboard. The Create Shared Dashboard page opens.
Enter this information.
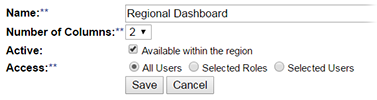
Field
Description
Name
Name you want to use for this dashboard.
Number of Columns
Number of columns (1, 2, 3, or 4) you want available for displaying and organizing gadgets.
Active
Whether the dashboard is available to users. Automatically selected, which indicates the dashboard is Active. Clear the check box to deactivate the dashboard and hide it from users.
Note: Administrators can view and work with inactive dashboards on the Dashboards List page by selecting the include inactive dashboards checkbox on the upper right of the page.
Access
Which users have access to the dashboard, including: All Users, Selected Roles or Selected Users.
Click Save. The new dashboard appears in the list, but it is blank.
Locate the dashboard and, on that row, click Configure. The page opens.
Take any of these actions.
If you want to...
Then...
Add a gadget,
Click Add Gadget. The Add Gadget window opens.
Locate the type of gadget you want to add, and on that row, click Add. The <Gadget Name> window opens. For more information, go to Available Gadgets.
Enter the parameters for that gadget. For more information, go to Gadget Parameters.
Click Done.
Resize a gadget,
Click the lower edge of a gadget and move it up or down.
Move a gadget,
Click the gadget title bar and move it to another position on the dashboard.
Refresh a gadget,
On the gadget title bar, click the refresh icon.

Adjust the parameters of a gadget,
On the gadget title bar, click the gear icon.

Delete a gadget,
On the gadget title bar, click the delete icon.

When you are done configuring the dashboard, in the upper right, click back.