![]()
The resource Detail View shows all details associated with the selected resource or sub-resource.
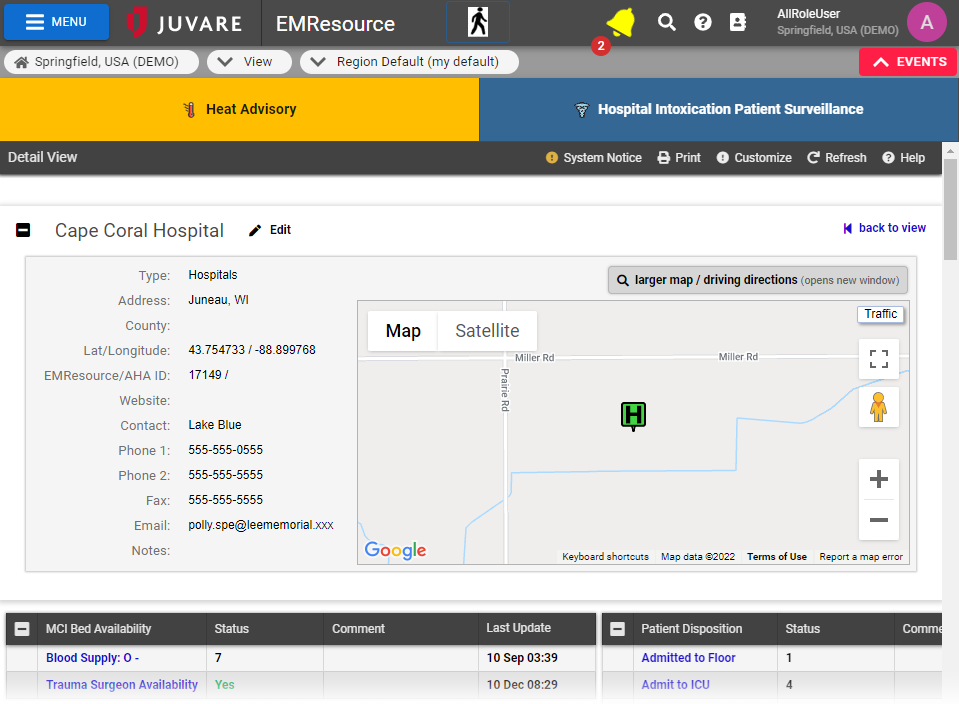
With appropriate permissions, you are able to customize this view as needed. This configuration is applied to all resource detail views in the region.
To view sections and their detail
In the main menu, click Setup and then click Views. The Region Views List opens.
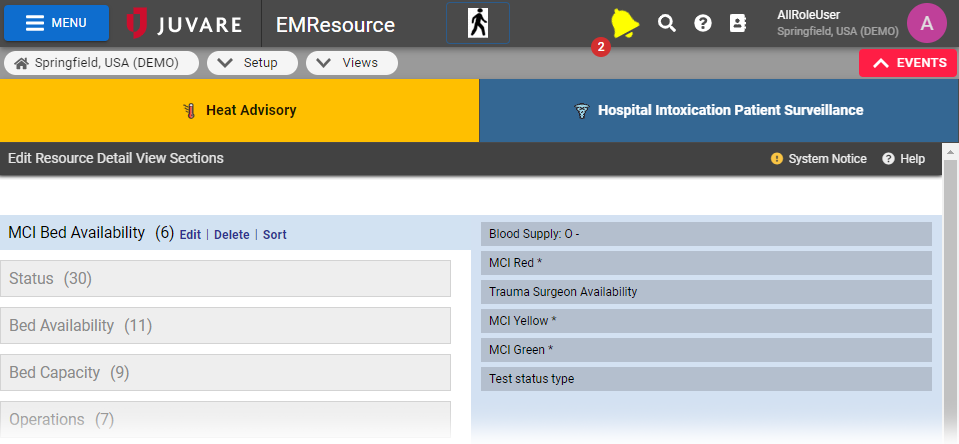
Click Customize Resource Detail View. The Edit Resource Detail View Sections page opens.
Click a section in the left pane to view the section's current statuses in the right pane.
To edit a section name
In the main menu, click Setup and then click Views. The Region Views List opens.
Click Customize Resource Detail View. The Edit Resource Detail View Sections page opens.
Click the section in the left pane.
Click the Edit link to the right of the name. The field is enabled.
Make your changes.
Click Submit.
To delete a section
Important: There is no confirmation or undo for this action.
In the main menu, click Setup and then click Views. The Region Views List opens.
Click Customize Resource Detail View. The Edit Resource Detail View Sections page opens.
Click the section in the left pane.
Click the Delete link. The system removes the section. In addition, the system moves all status types that were in the deleted section to the No Section Assigned area.
To sort details in a section
In the main menu, click Setup and then click Views. The Region Views List opens.
Click Customize Resource Detail View. The Edit Resource Detail View Sections page opens.
Click the section in the left pane.
To sort, do one or both of the following:
Click the Sort link to the right of the section name.
In the right pane, click a detail and drag it to the appropriate spot in the list.
To add or move a detail to a section
In the main menu, click Setup and then click Views. The Region Views List opens.
Click Customize Resource Detail View. The Edit Resource Detail View Sections page opens.
Click the name of the section that contains the status type, or click No Section Assigned.
In the right pane, click the status type and then drag and drop it on the name of the section to which you want to add/move it.
Click the section name to see the newly added detail.
To create a section
In the main menu, click Setup and then click Views. The Region Views List opens.
Click Customize Resource Detail View. The Edit Resource Detail View Sections page opens.
Scroll to the bottom of the Edit page.
Enter the name of the new section.
Click Create Section. The new section appears at the bottom of the sections (and above No Section Assigned).
Use the steps in the add or move procedure above to add details to this section.
To sort all sections
To sort the details for all sections in alphabetical order, scroll to the bottom of the page and click Sort All.
To work with sub-resources
In the main menu, click Setup and then click Views. The Region Views List opens.
Click Customize Resource Detail View. The Edit Resource Detail View Sections page opens.
Click Sub-resources. The Edit Sub Resource Details View Sections page opens.
Click a resource type's name (in the left pane) to view associated status types (in the right pane).
To include a sub-resource type, select its check box in the left pane.
In the right pane, select the check box for each status type you want to include, or clear the check box to exclude it.
To re-order the status types list (right pane), click and drag a status type to the appropriate spot in the list.
To re-order the sub-resource types (left pane), click and drag a type to the appropriate spot in the list.
To sort all sub-resources and status types in alphabetical order, click Sort All.
Click Save.