![]()
Once an incident has been resolved, you can end the incident in eICS and decide if you need to notify contacts.
When you choose to end an incident, the End Incident and Notify Contacts window opens. It helps you quickly identify None, All, or Selected contacts and allows you to choose Voice and/or Email and Mobile notifications. Additionally, contacts that are logged in to eICS when the incident is ended will see a notification in the solution. After ending the incident, the Incident Dashboard looks slightly different because certain features are no longer available (for example, custom tabs) and other features, like the Improvement Plan tab, are added to the dashboard.
Note: If an incident is ended by mistake, you can re-open it. However, once an ended incident is closed, it cannot be re-opened. If you need assistance with an ended or closed incident, contact Juvare Support.
To end an incident
Point to Response and click Incidents. The Incidents page opens.
Locate the incident in the list and on that row click View. The Incident Dashboard opens with the Summary tab active.
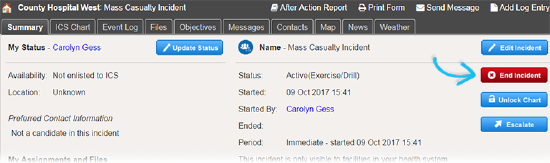
On the right, click End Incident. The End Incident and Notify Contacts window opens.
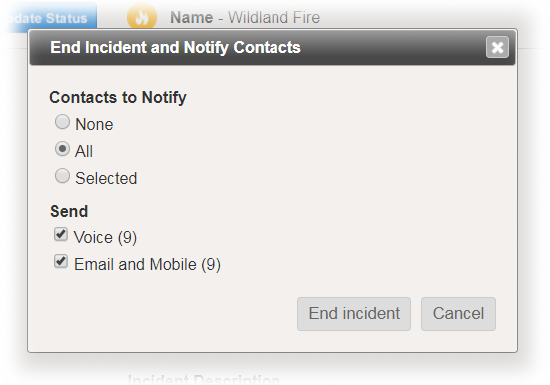
For Contacts to Notify, take one of these actions.
If you want to... Then... Not notify any contacts, If it is not already selected, click None. Notify all contacts,
- Click All. The Send area appears.
- To identify the notification method, select or clear the Voice and/or Email and Mobile check boxes.
Notify only some contacts, - Click Selected. The contacts area appears.
- Enter part or all of the contact's name or ICS position. Or, click Add all. Results appear below.
- For each contact you want to notify, select the check box for the corresponding notification method you want to use.
Click End Incident. The window closes.
Note: Ended incidents can be located by pointing to Recovery and clicking Incident Reports.