![]()
Actions and tasks you perform in eICS are divided into three main areas that correspond to the Planning, Response, and Recovery phases of an incident command system and workflow. The information you enter in these different areas and how you maintain that information can affect your readiness and ability to respond effectively to an incident. complete actions in the other areas. For more information, see the article Navigation Elements.
Top Menu
The top menu appears on every page in the application and provides access to key resources, including the integration menu, the Home page, Planning, Response, Recovery, Settings, Contact Us, Help, and Log Out.
| Feature | Description |
|---|---|
eICS or Common Account Management (CAM) integration menu | Available if your organization has other Juvare applications that are linked to eICS. CAM allows you to quickly move between Juvare solutions. |
Home icon | Provides quick access to the Home page from anywhere in the system. |
Planning | Offers access to the Plan Summary, Library, Contacts, and Facilities. |
Response | Offers access to Create Incident, Conduct Test, or a list of incidents for the selected domain or facility. |
Recovery | Offers access to Incident Reports and the Improvement Plan. |
Settings | Provides access to My Profile and possibly other functions depending on your role and permissions. |
Contact Us | Opens a window with contact details for non-technical and technical support resources. |
Help | Opens the client hub, which includes help documentation, product announcements, and other resources. |
Log Out | Allows you to securely exit the solution. |
Home Page
Home is the page that appears when you log in to eICS Web and when you click the home icon in the upper left.
This page provides important information about active incidents and the improvement plan, as well as quick links and announcements.
| Feature | Description |
|---|---|
Active Incidents | Table on the upper left listing active incidents and drills. Each listing contains a link to the Incident Dashboard, the icon representing the type of incident, as well as the name of the facility and incident, start date, and operational period. By default, incidents are sorted chronologically by start date. You can reorder them by clicking the Start Date column header. |
Improvement Plan Assignments | Table on the lower left listing improvement plan items assigned to you for the selected facilities. Each listing includes the expected action, due date, and issue, along with a link to update the issue. By default, items are sorted chronologically by due date. |
Quick Links: Create Incident | Shortcut that takes you to Response > Create Incident. For details on creating an incident, see Create an Incident. |
Quick Links: Update My Information | Shortcut that takes you to Settings > My Profile. For details on editing your profile, see Edit Your Profile. |
System Announcement | Important announcements can be posted here to inform users that access the system. If you are the Domain Administrator, at some point you may need to Edit the Home Page Announcement. |
Planning
Planning your incident command structure and communications is critical to the success of your organization's response and recovery operations. eICS supports your planning efforts by providing you with the tools you need to construct plans before they are needed for an emergency situation. You can set up and maintain facility, agency, organization, and community contacts, which can help you establish relationships with relevant entities and individuals in your community. The system offers a single repository for emergency plans and a variety of other incident command documents. When an incident occurs, your command staff and responders know where to find the information they need.
Planning has four options that take you to different pages designed to aid you in planning and preparing for incidents.

Plan Summary
The Plan Summary page allows you to identify plans for specific incidents and specify the plan's files, chain of command, and incident response guides (IRGs). Features on this page include:
- Summary for lists the facilities and/or domains to which you have access. Select the one for which you want to plan.
- Plan shows all plans available for the selected facility or domain. Creating a new plan adds it to this list.
- The tree-like structure of folders on the left represents components of the plan. Details for selected elements appear on the right. The main components are:
- (Name) Plan Summary contains the plan Name, Description, Status (if applicable), and date Created. You can print the plan summary, and add or edit the description. Domain Administrators can also make the plan available to each facility and/or lock the plan's ICS chart from this page.
- Plan Files lists files associated with the plan. You can view the files, and change the IRGs and positions related to each file.
- ICS Chart lists positions associated with the plan.
- For each position, you can view the Chain of Command; add or edit the Position Contact Information; add or remove contacts from the Depth Chart; view, add or remove Position Files; and select the Active Incident Response Guides associated with this position.
- For the Labor Pool and other groups you can view Group Details, add and remove Contacts, and select the Active Incident Response Guides associated with the group.
- Incident Response Guides lists guides associated with the plan. Depending on your role, you may be able to create new or copy existing guides. For each guide, you can add, edit, or delete General information; select ICS Positions/Labor Pool/Notification associated with the guide for this type of incident; add, edit, or delete Objectives; view, add or remove Files; add, edit, or delete Locations.
Library
The Library page provides access to standard incident command documents and allows you to add to the collection. Features on this page include:
- Library for lists the facilities and/or domains to which you have access. Select the appropriate one to view its library.
- The search feature is available toward the bottom of the left area. From here you can also add folders and files.
- The tree-like structure of folders on the left provides access to documents and forms associated with each plan such as HICS forms and reports, job action sheets, positions descriptions, and much more.
- Expand a folder on the left to view subfolders and documents within it.
- Select a folder to view its details on the right. You may also be able to rename or delete the folder.
- Select a file to see its details on the right, and to view, check out, rename, or delete the file; add or edit Associations to ICS Positions; add or edit Associations to Incident Response Guides; and view the file's Version History.
- Use the Resource Documents area to store any other documentation you want to make available to responders. This is especially useful for documents that are more general in nature and do not apply specifically to any given plan.
- Print allows you to print the entire library.
- You may also be able to copy or move files using the Copy/Move Files feature.
Contacts
The Contacts page provides access to the selected domain or facility contacts and, depending on your role, allows you to add, edit, and delete contact information and more. Features on this page include:
- Contacts for lists the facilities and/or domains to which you have access. Select the appropriate one to view its contacts.
- By default, the left area does not include contacts outside the selected facility or domain. You can view additional related contacts by selecting the Show all Health System Contacts check box.
- The search feature is available toward the lower left corner. From here you can also click Add New Contact to add a contact to the facility or domain.
- When a contacted is selected, the right area shows the contact's details.
- From the General Info / Email / Phone drawer, you can add to or edit the contact's name, organization, contact information, and more.
- You can also add or edit Address information; manage the contact's ICS Positions; and manage the contact's Account Information / Log In access, including activating or deactivating the contact, resetting their password, resending the eICS welcome message, changing the contact's primary email address, and adding or changing the contact's access to facilities and their role at each.
- You can add Notes to the contact's record.
Facilities
The Facilities page is available to administrators. If you are a Facility Administrator, you can add or edit the facility's address, location (coordinates), type, Command Center details, and Incident Dashboard tabs. If you are the Domain Administrator, features on this page include:
- The search feature is available toward the lower left corner. From here, you can also click Add New Facility to add a facility to your domain.
- When a facility is selected, the right area shows its details.
- From the General tab, you can add to or edit the facility's name, address, location (coordinates), and type.
- The Details tab allows you to change the facility's associate Health System and Available Plans; specify the facility is to be shared with WebEOC; add or change Command Center details; and work with the custom Incident Dashboard tabs.
- You can also Delete the facility from either drawer.
Response
Response has three options that take you to different pages designed to help you create and manage incidents.

Create Incident
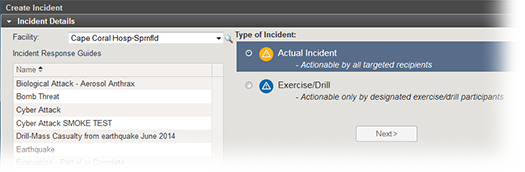
The Create Incident workflow consists of two pages. First you specify the type of incident and then its details.
Features on the first page include:
- On the left, Facility lists the facilities to which you have access. Select one to begin the process.
- The Incident Response Guides section lists all IRGs associated with the selected facilities. Select the appropriate one to continue.
- The right side of the first page is where you identify whether this is an Actual Incident or an Exercise/Drill.
Features on the second page include:
- Selecting the Allow State/Region to view this incident gives individuals outside your facility access to the Incident Dashboard. For example, other facilities in your health system can view it. If appropriate, details can also be accessed from within EMResource®.
- Name allows you to add or change the default text.
- You can accept the default information in the Incident Description/Notification Message section (if any) or edit it.
- You can accept the default information in the Incident Mission Statement section (if any) or edit it.
- The Command Center Details section shows any contact information that was identified by default for this type of incident. You can add to and change this information.
- Select Notification Contacts shows the list of contacts appearing in the depth chart for the positions identified in the selected IRG. You can specify the methods (voice and/or email) by which these individuals are to be notified.
Conduct Test
The Test System Notification workflow consists of two pages. First you specify the test details and recipients, and then monitor the results.
Features on the Conduct Test page include:
- Facility lets you specify the facility for which you want to run the test.
- Special Instructions allows you to enter information that you want recipients to see.
- Candidates to notify lists all contacts at the selected facility, allowing you to select the individuals you want to include in the test, and also specify whether they will be contacted by voice and/or email.
Features on the Test Incident Administration page include:
- Candidates shows the recipients you selected for the text.
- Selecting a candidate on the left shows you details about methods in the Notifications section on the right. For each method attempted, details include the time of the test, the number or address used, whether the notification was confirmed by the recipient, and the method's system status.
- You can Send New Notification to this same group of recipients.
- End Test stops all notifications that have not been sent and ends the test.
- Print Report lets you print the test details and results.
Incidents
The Incidents page shows all incidents for a facility. Features on this page include:
- Incidents for lists the facilities to which you have access. Select one to view its incidents.
- By default, the page does not show test or archived incidents. You can clear the Hide Test Incidents and/or Hide Archived Incidents check boxes to include them in the list.
- Clicking a row on the left shows General details on the right, including the status, when it started, its name, the last update, and more.
- Clicking the incident's View link opens its Incident Dashboard.
Recovery
Incident Reports
The Incident Reports page lists incidents, which can be active and/or inactive depending on the user’s role, and provides access to forms and reports. Features on this page include:
- Inactive Incidents for lists the facilities to which you have access. Select one to view its inactive incidents.
- By default, the page does not show test or archived incidents. You can clear the Hide Test Incidents and/or Hide Archived Incidents check boxes to include them in the list.
- General details and After Action Report. On the left, click the name of an incident to open its General details, with access to the Print Form option, and the After Action Report.
- Access to the Incident Dashboard. On the left, click the incident's View link opens its Incident Dashboard. You can also generate forms and reports from the dashboard.
Improvement Plan
The Improvement Plan page show the items that have been flagged as potential improvements to your plan. These can range from needing to associate a particular position with an IRG to adding objectives to the incident type or a position. Features on this page include:
- You can view items by the issue that was entered (Issue View) or by the action items associated with the issues (Action View). You can also filter the list by the status of the issue or action and by facility.
- Edit allows you to edit the issue or action item, including adding and deleting action items. History lets you view the history of changes to the issue or action item. Delete allows you to delete the issue.
- The option to Add Improvement Item allows you to add an issue to the plan, identify the action items for that issue, and assign responsibility to each action.
- You can also click Print Report to generate a report of the improvement issues or action items.
Settings
My Profile
From the My Profile page, you can updated your profile information at any time. Features on this page include:
- In the General Info / Email / Phone drawer:
- Reset Password lets you change your password, and Edit Security Question allows you to set or edit the security question that the system uses to help identify you if you forget your password.
- Change Primary Email lets you specify a different email for system notifications such as emails sent when your password has been changed.
- You can edit your name, organization, resource type, and other contact information, as appropriate, and also manage your mobile devices.
- You can select to include the contact information for Domain Administrators on the Contact Us window as the source for non-technical support.
- You can add or edit Address information; view your currently assigned ICS Positions; and view Notes that have been entered in your profile.
Domain Notifications
The Domain Notifications page is available to you under Settings if you are the Domain Administrator. Features on this page include:
- Access to every variation of notification template available:
- Each Notification type template, including Availability Request, Incident Escalation, Incident Ended, and more. You can edit the description of the notification, which is for administrative use only.
- Each notification type for either Incident type: Actual or Drill.
- Each message template based on the Channel (notification method) for the message: Email or Voice.
- You can edit the text of the subject line and message for emails, and the message for voice notifications. Variables you can include in messages are also available.
- Click Send Test Notification to send this particular message to yourself so you can verify your content changes are correct.
- Click Restore to system defaults to remove all changes to the message template you are viewing.
Footer
The footer, appears at the bottom of every page and includes the Terms of Service, Privacy Policy, product version number, your user name, and the date and time of your last action in eICS. You can review or access this information at any time.
