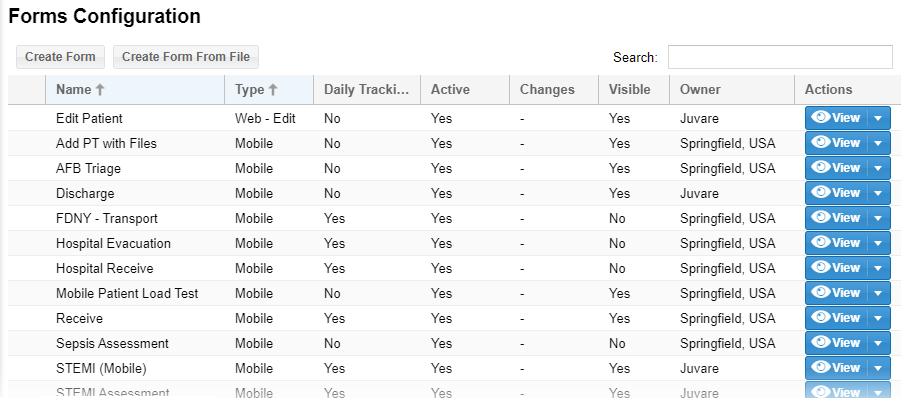
Administrators can manage forms through System Settings, by clicking Patient Forms to open the Forms Configuration page. Forms are listed alphabetically by Name and Type, but can be reordered in ascending or descending order by clicking on any column header. Standard forms provided by Juvare, such as MCI Triage, Add Evacuee, Add Daily Patient, and Vaccination are automatically available and Juvare is identified as the Owner.
Additional information provided on the Forms Configuration page includes:
- Name - Title of the form.
- Type - Intended platform and function of the form (Web - Add, Web - Edit, and Mobile). For example, mobile forms are only available for use with the mobile application. When creating and designing a form, it is essential to select the correct type because this determines available fields, and the type cannot be changed through editing or copying a form.
- Daily Tracking - Only available on "add" forms. Indicates the form will be available in run mode, when the run clock has been started. Tracking options are configured through the Tracking Number field on forms.
- Active - Indicates the form has been Saved and Published, and is ready for use. Forms must be Active before they can be made Visible. Once Active, forms cannot be made inactive. However, Active forms do not need to be Visible. For more information, go to the procedure Design and Publish a Form.
- Changes - Indicates changes on an Active form were saved, but not yet Saved and Published. If the form is Visible, users continue to have access to the original form while changes are Pending. Save and Publish replaces the original form with the changed form.
- Visible - Controls end user access to the form. Forms must be Active before they can be made Visible, but Active forms do not need to be Visible.
- Note: Forms must be Active before they can be made Visible. Form visibility is also determined when creating a form by indicating whether the form should be available to all providers and roles or selecting specific providers and roles.
- Owner - Creator or originator of the form. Ownership determines whether the form can be edited and/or designed. All forms can be copied.
- Actions - Menu that allows you to View, Edit, Design, Copy, or Delete the form.
It is quick and easy to create new forms; however, new forms must then be designed to add and configure the fields and field elements you want to comprise the form. Before creating a new form, it is useful to review existing forms to see if one of them already meets your needs or could be copied and adjusted slightly to meet your needs.
Through the Forms Configuration page, Regional Administrators can take one or more of these actions.
| If you want to... | Then... |
|---|---|
Create a form, | Go to the procedure Create a Form. |
Reorder forms in the table, | Click a column header once to reorder forms in ascending alphabetic order. Click the column header again to reorder forms in descending alphabetic order. |
Specify the Type and/or Daily Tracking option, | Go to the procedure Create a Form. Daily Tracking is only available for Mobile forms. |
Make a form Active or make Changes, | Go to the procedure Design and Publish a Form. |
Make a form Visible, | Go to the procedure Edit a Form. |
Make a form the Default, | Go to the procedure Edit a Form. |
Make a form available to users through the Select Form list on the Patients page or mobile app, | Locate the form in the table and on that row, select the check box in the Visible column. Note: To make a form visible, it must be published (see Design and Publish a Form). |
Identify which form opens automatically when users access the Patients page or mobile app, | Locate the form in the table and on that row, select the check box in the Default column. Note: To make a form the default, it must be published (see Design and Publish a Form) and visible. |
Specify the order forms appear in the Select Form list on the Patients page, | Click Sort Web Forms. The Sort Web Forms window opens. Take one or more of these actions. If you want forms listed alphabetically, select the check box for Sort alphabetically. If you want forms listed in a specific order, click the name of a form and use the arrows on the right to move it up or down in the list. Click Save. |
Specify the order forms appear in the list on the mobile app, | Click Sort Mobile Forms. The Sort Mobile Forms window opens. Take one or more of these actions. If you want forms listed alphabetically, select the check box for Sort alphabetically. If you want forms listed in a specific order, click the name of a form and use the arrows on the right to move it up or down in the list. Click Save. |
View, edit, design, copy, or delete a form, | Go to the corresponding procedure:
|
