![]()
From the Incident Dashboard, incident participants can send and respond to messages using the instant messaging service within eICS.
New messages can be created from anywhere on the Incident Dashboard using the Send Message link located on the upper right of the dashboard or through the Send Message button located on the Messages tab, below the list of messages. The Send Message window opens and allows you to quickly write and send new messages to all candidates, all assigned positions, or participants selected by name or position.
You can respond to messages from the Messages tab. With a new or response message, you can identify message recipients, indicate whether the message will be sent to recipients’ email address as well, enter the message, and select whether the message is sent from you or an ICS Chart position.
To send a message
On the Home page, in the list of Active Incidents, locate the incident and on that row, click View. The Incident Dashboard opens.
On the upper right of the dashboard or below the list of messages on the Incident Dashboard - Messages tab, click Send Message. The Send Message window opens.
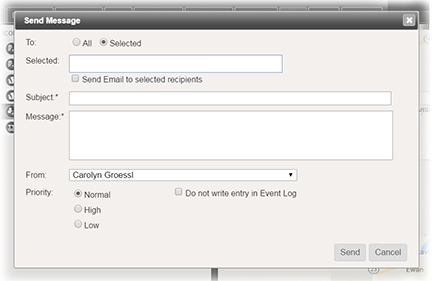
Enter this information.
Field
Description
Options
To
To whom the message will be sent.
- All, which by default includes All candidates. Alternately, you can choose to send the message to All assigned positions.
- Selected, which requires you to enter participants by name, ICS Chart position, or group.
Send Email to selected recipients
Identifies if you also want the message sent to recipients' email addresses.
- Select to send emails
- Clear to not send emails
Subject
Summary, overview or main purpose of the message.
NA
Message
Text describing the message or main body of communication.
NA
From
From whom the message will be sent.
By default, the user’s name is selected; however, an ICS chart position can be selected.
Priority
Indicates the level of importance or urgency of the message.
- Normal
- High
- Low
Do not write entry in Event Log
Indicates whether the message will appear in the Event Log
- Select the check box to not add the message to the Event Log
- Clear the check box to add the message to the Event Log
Click Send. The window closes and the message appears in the list of Messages.
To respond to a Message
On the Home page, in the list of Active Incidents, locate the incident and on that row, click View. The Incident Dashboard opens.
Click the Messages tab.
On the left, in the list of messages, click the message to which you want to respond. The message Details appear on the right.
Below the Details, click Add Response. The Add Response window opens.
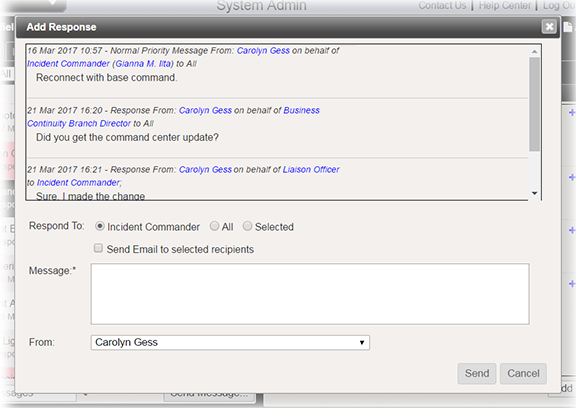
Enter this information.
Field
Description
Options
Respond To To whom the message will be sent. - Name of the person who sent the original message.
- All, which by default includes All candidates. Additionally, you can send the message as an email to All candidates or All assigned positions.
- Selected, which requires you to enter participants by name, ICS Chart position or group. Additionally, you can send the message as an email to selected recipients.
Send Email to selected recipients
Identifies if you also want the message sent to recipients' email addresses.
- Select to send emails
- Clear to not send emails
Message Text describing the message or main body of communication. NA
From From whom the message will be sent. By default, the user’s name is selected; however, an ICS chart position can be selected.
Click Send. The window closes and the message appears in the list of Messages.
Note: If the original message was marked Do not write entry in Event Log, messages sent in response are likewise not added to the Event Log.