![]()
When you do not have active incidents, you may want to test your system notifications. This procedure outlines how to conduct the test, including initiating the test and monitoring your results. The results help you determine whether there are problems in the system, such as incorrect contact information. For more information, refer to System Test.
To start the system notification test
From the Home page, point to Response and click Conduct Test. The Conduct Test page opens.
For Facility, select the facility you want to test. Facility candidates appear on the right.
On the right, select or clear the check box for candidates you want to notify By Voice and By Email.
Click Initiate Test. The Test Incident Administration page opens, showing the status and results of the attempted notifications.
As you monitor the results of the system test, you may decide to send another notification. Your goal in doing so would be to send the same test notifications to this set of participants or several participants within this set. Alternatively, your goal could also be to retest only voice or email notifications for a set of participants.
To monitor test results
You can monitor the test results from the Test Incident Administration page, which is accessed from the list of incidents on the Home page or Response > Incidents (with the Hide Test Incidents check box cleared). As participants confirm receipt of the voice and/or email notification, the system records their responses and updates their statuses on the Test Incident Administration page.
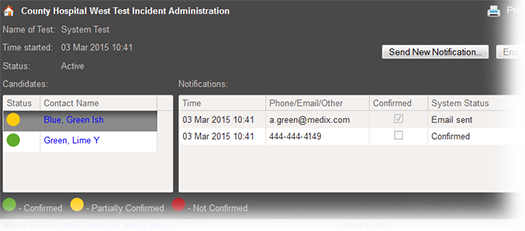
On your Test Incident Administration page, look for these elements.
| Element | Description |
|---|---|
Header | The page header information includes test details, such as the date and time initiated and overall test status. |
Left Side | Candidates included in the test appear in a list on the left. Selecting a candidate shows the notification details on the right. If the candidate has confirmed receipt of all notifications, the Status column shows the green circle icon (Confirmed). If a recipient has indicated receipt of only one notification, the column shows the yellow circle (Partially Confirmed). If the individual has not confirmed any method, the column shows the red circle (Not Confirmed) . |
Right Side | The notifications attempted for the selected candidate appear on the right. The table lists details for each attempted notification, including the date and time of the attempt (Time), the type of notification method (Phone/Email/Other), whether the recipient has confirmed the method, and the status of the attempt (System Status). The system automatically updates this information periodically so that you can continue to monitor your test results. |
Note: For more information on statuses, go to the procedure Tracking Notification Responses. The report section of the topic defines the statuses that are possible in the System Status column.
To resend test notifications
On the Test Incident Administration page, click Send New Notification. The Send New Notification window opens.
Select or clear the check boxes for participants to whom you want to resend the notification.
For Message to send, enter the message you want to include in the notifications.
Click OK. The system sends the new notifications and adds those participants to the list on the right.
To end the test
On the Test Incident Administration page, click End Test. The Send New Notification window opens.
To generate and print the test version of a Response Tracker report
On the Test Incident Administration page, click Print Report. The report opens. For more information about the report, go to the procedure Response Tracker Report.