![]()
A day-to-day status represents the resource's current operation level or limitations. Some facilities also refer to this as their facility status. Your administration can specify that certain statuses must be updated on a regular or predefined basis.
Authorized users can update statuses as information changes or when the system prompts them to do so (based on your local policy). The user can update a single status or more than one at a time. How the user updates the information depends on the type of resource and the kind of data being requested.
Users authorized to update a resource can also update the statuses for its sub-resources. In general, these are available via the parent resource's detail view. In addition, a view may be configured to include primary sub-resources. If so, you can update that sub-resource's statuses from the view.
For additional details such as status reporting, overdue statuses, data types, and authentication, refer to About Resource Statuses.
Accessing the Update Status
You can change your resource's most critical statuses at any time from the appropriate Views. You may also be able to update primary sub-resource statuses from Views. To open the Update Status page from a View, you can:
- Click the keys icon in the first column.
- Click the resource's status in the status column.
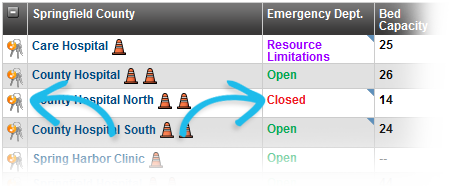
Your region's status column names are customized to your region. In the example above, the column header for the primary status is Emergency Dept. If the status is not available in a view, it is accessible from the resource's details page. Click the resource's name, locate the status you want to change, and click its current value. The Update Status page opens.
Tip: You can also update resource statuses from the Map view.
Updating a Resource's Statuses
You can update:
- A single resource status.
- Multiple statuses.
To update a single resource status
- In the main menu, click View and click the appropriate view.
- Locate the resource and take one of these actions.
- Click the keys icon in the first column. The update page contains all of the status types specified for this resource type in this view.
- Click the resource's status. This update page contains this status only.
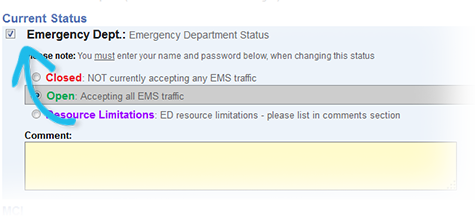
- Make certain the status type's check box (at the top of the section) is selected.

- Select or enter the status.
- If appropriate, select the reasons for the status you selected.
- For Comment, enter any details about when or why you updated the status.
- If prompted, enter your name and password.
- Click Save.
To update multiple statuses
- In the main menu, click View and click the appropriate view.
- Locate the resource and do one of the following:
- Click the keys icon in the first column. This opens the update page containing all of the status types specified for this resource type in this view.
- Click the resource's status. This opens the update page containing this status only.
- To update more statuses for this resource, click the Show All Statuses link. The Update Status page shows the items you can update for this resource.
- Update statuses, as follows:
- At the top of its section, select the check box for a status type you want to update. The item expands to show the elements you can update.
- Select or enter the status.
- If appropriate, select the reasons for the status you selected.
- For Comment, enter any details about when or why you updated the status.
- Repeat for each item you want to change or update.
Tip: To select all status types so that you can update them all, click the Select All link in the upper left corner of the page. This expands every status section so that you can make your changes.
- At the top of its section, select the check box for a status type you want to update. The item expands to show the elements you can update.
- If prompted, enter your name and password.
- Navigate to the bottom of the page and click Save.
To import one or more status updates
- In the main menu, click Update and then click Bulk Status Upload. The Bulk Status Upload page opens.
- Click Bulk Upload Template. The template is downloaded through your web browser.
- Open the template and enter the new status values for one or more statuses.
- Save and close the file.
- On the Bulk Status Upload page, click Choose File. The browser navigation window opens.
- Locate and click the file you updated.
- Click Open. The file name appears on the page.
- Click Submit Values. The file is uploaded and status values are updated.
Updating Sub-Resource Statuses
Sub-resource statuses may be available from the resource's Detail View page.
If you are authorized to update the status for a resource, you can also update statuses for its sub-resources.
Note: Review the information in the Access Resource Status section; many of these points apply also to sub-resources, including the types of data and level of authentication.
You can update:
To update a primary sub-resource's statuses from the View
A view may be configured to include primary sub-resources. When available, you can update a primary sub-resource's statuses from the view.
- In the main menu, click View and click the appropriate view.
- Locate the resource and do one of the following:
- Click the keys icon in the first column. This opens the update page containing all of the status types included in this view.
- Click the sub-resource's status. This opens the update page containing this status only.
- Update statuses, as follows:
- At the top of its section, select the check box for a status type you want to update. The item expands to show the elements you can update.

- Select or enter the status.
- If appropriate, select the reason(s) for the status you selected.
- For Comment, enter any details about when or why you updated the status.
- Repeat for each item you want to change or update.
Tip: To select all status types so that you can update them all, click the Select All link in the upper right corner of the page. This expands every status section so that you can make your changes.
- At the top of its section, select the check box for a status type you want to update. The item expands to show the elements you can update.
- If prompted, enter your name and password.
- Navigate to the bottom of the page and click Save.
To update sub-resource statuses from the Detail View
- In the main menu, click View menu and click the appropriate view.
- Click the resource's name to view its detail. The Detail View opens.
- In the sections containing sub-resources, do one of the following:
- Click the keys icon in the first column to view and change multiple statuses.
- Click in the status column to view and change that status.
- If you clicked a single status, click the Show All Statuses link to see all statuses for this sub-resource. The Update Status page shows the items you can update for this sub-resource.
- Update statuses, as follows:
- At the top of its section, select the check box for each status type you want to update. The item expands to show the elements you can update.
- Select or enter the status.
- If appropriate, select the reasons for the status you selected.
- For Comment, enter any details about when or why you updated the status.
- Repeat for each item you want to change or update.
- If prompted, enter your name and password.
- Click Save.