![]()
Views are customized configurations of your region's resources and statuses. Users with the appropriate permissions can configure any number of views to support your region's needs, and make them available to any or all regional users.
You can construct views using resource types, resources, and status types. You can display these elements in any order, though resources must stay grouped within their corresponding resource type.
Each user can also set up their own custom view and make it their default view. You can also set up views that span regions.
Refer also to About View Configuration.
List of Views
The Region Views List shows the views established for your region.
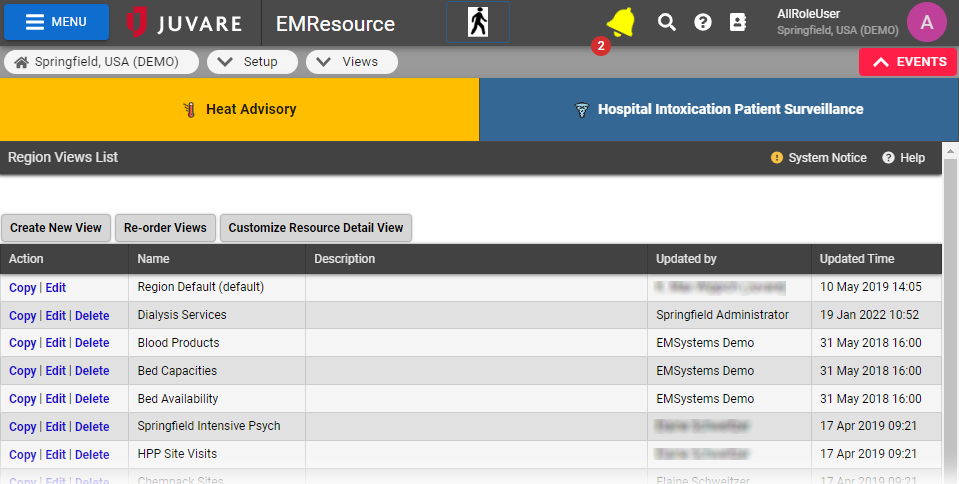
Column | Description |
|---|---|
Action | Actions you can perform, including copying a view to start a new one, editing a view, or deleting a view. Any user who has been assigned the Setup Region Views right, individually or via their role, can edit the Region Default view. This view cannot be deleted. |
Name | Name provided for the view; this is the name that appears in the View menu. |
Description | Description of the view; this is for administrative purposes only. |
Update by | User who last updated the view. |
Updated Time | Date and time the view was last updated. |
From here you can edit or create a view, specify a different order of views in the View menu, or customize the layout of your resource Detail View.
Every user has access to the Region Default view. The user can choose an existing view as their default. Users can also configure their own custom view, in which they can regroup resources in a way that is meaningful to them.
Multi-region Views
If you have access to more than one region and have been granted the Setup Region Views right, you can create views that include multiple regions. The workflow is the same as for any other view.
As with any other view, you have the option to generate a "snapshot" of the multi-region view.
If the user can view a resource, but does not have view rights for any status types included in the multi-region view, the resource appears in the view without any status types. In addition, the resource appears in the Map view without being color-coded, since the status type defines its color.
Creating and Editing Views
When creating or editing a view, you decide the region or regions to include, specify the sub-resource types to be included in the view, and specify the status types, resource types, and individual resources that appear in the view. You can specify the order in which resources appear within their resource type, the order of status types, and much more.
The view creation process is set up to guide you through the various steps. This "wizard-like" approach helps ensure you review all necessary elements. Using the Next button guides you through the entire process of setting up or editing a view.
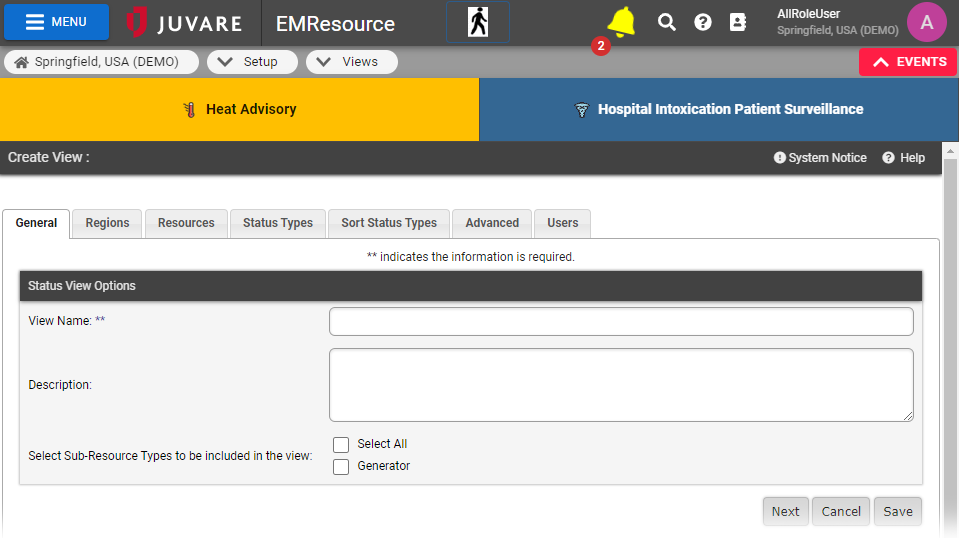
You can elect to make the view automatically visible to all users in the included regions. If you do not, each user must be granted specific access to the view.
Searching and Filtering
Creating and editing views is performed through a series of tabs. On the Resources, Status Types, and Users tabs you can search and filter elements to help you find the items you want to include in the view.
In Resources and Status Types, you can filter by selections, resource types, sections, sub-resource types, standard resource types, and status types to view only those items.
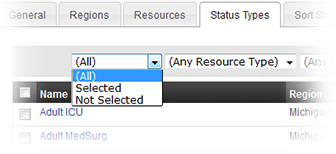
In the Resources and Status Types tabs you can also sort by column, which can help you locate the options you want.
In the Users tab, you have the option of filtering by Role.
In each of these tabs, after using search and filter options, you can click Show All (top right) and/or Clear Selections (bottom left) to remove filters and selections.
Tabs and Fields
The following table lists and describes each tab that is available when creating and editing a view.
Field | Description |
|---|---|
General tab | |
View Name | Specify the name of the view (required). This name appears in the View menu and in the view's header. |
Description | Enter a description of the view. The description is for administrative purposes only. |
Select Sub-Resources Types to be included in the view | Select the sub-resource types that can be available in the view. When selected, the primary sub-resource of that type may appear in the view, depending on other selections you make. |
Regions tab | |
Select regions to be included in this view. | Select one or more regions to include in the view. |
Resources tab | |
Select resources to be included in this view. | Select resources to include in the view. Tip: You can sort the list by name or you can use the search fields at the top to locate the specific resources. |
Status Types tab | |
Select status types to be included in this view. | Select status types to include in the view. You can include daily and event-only status types. Tip: You can sort the list by name or you can use the search fields at the top to locate the specific status types. |
Sort Status Types tab | |
Adjust sort order for selected status types. | Specify the order in which the status types should be displayed in the view. You can also specify alphabetic order by clicking the Sort alphabetically option at the bottom of the tab. |
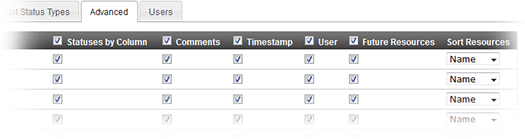
Advanced tab | |
Configure settings for resource types in this view. | Configure each of the Resource Types listed and specify the order in which the resource types appear in the view. By default, all options are selected. You can include the New Resource Types added in future option when setting the order. If new resource types are added in the future, they appear in the view where this option appears in this list. |
Region | Region to which this resource type belongs. |
Resource Type | Resource types included in the view. You can change the name that appears in the view for these resources. This comes in handy when creating multi-region views since Resource Type names may be repeated among regions. Or, you might want to change the name to one that fits better with this particular view. |
Statuses by Column | Select to show statuses in the view in columns rather than rows (not selected). |
Comments | Select to show in the view any comments that were entered the last time the status was updated. |
Timestamp | Select to show in the view the date and time of the last update to the status. |
User | Select to include in the view the name of the user who last updated the status. |
Future Resources | Select to automatically include in the view any resources that are added to the resource type in the future. |
Sort Resources | Sort resource information by choosing one of the following: Name, Status, Custom. If you choose Name, select ascending or descending order. If you choose Status, select the status by which to sort and, if appropriate, select ascending or descending order. If you choose Custom, set the sort order for resources or specify they should be sorted alphabetically. |
New Resource Types added in future | Select to automatically include in the view any resource types that are added to the region in the future. You can only specify this option for the originating region that is, the region you or another user was logged into when the new view was set up. |
Sort buttons | For quick sorting, use the buttons at the bottom of the table to sort by region, resource type, or region and resource type. |
Other Options: Display Status Type Summary | Select to include grand totals at the bottom of the view. A grand total appears for each numeric status type that is set up to display summary totals. |
Fix columns width | Select to apply a fixed width to the Comments, Last Update time, and last update By User columns. |
Users tab | |
Security | Select the check box to make the view available to all users in all selected regions or clear it to select individual users. |
View Types
When creating a new view, the options you specify in the Advanced tab define the view's type.
This topic illustrates the different types and how you achieve each.
Summary
To create a summary view, in the Advanced tab select the Statuses by Column option and clear the check boxes for the Comments, Timestamp, and User options.
Your view will look similar to the following:
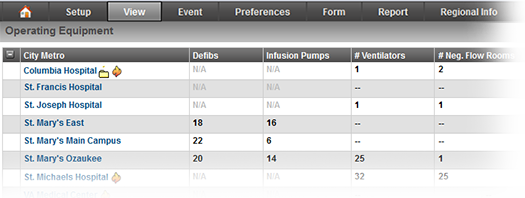
You can also create a summary view with Comments by selecting that option. Comments can include the reasons why a status was changed, which can be useful information for many of your users.

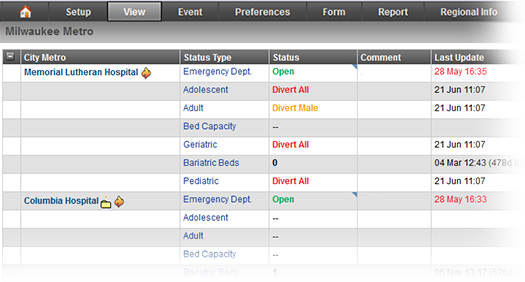
Resource
To create a resource view, in the Advanced tab clear the Statuses by Column option and select the Comments option.
Your view will look similar to the following:
Hybrid
You can always create a Hybrid view by specifying a specific view type (Summary or Resource) for each resource type included. In addition, you can specify whether status change information (Timestamp and/or User) should be included.